If this is your first time, begin with Getting started. To look up an operation, use the contents below.
Open Settings using the gear at the bottom right of the Controller, or File → Settings. For help with the basics, see Troubleshooting.
Screenshots show the English interface. Click a screenshot to enlarge it.
01Getting started: from two displays to ON AIR
Where: Windows display settings / PLAYLIST in the center, EDIT on the left, and ON AIR on the right of the Controller
VTR-PON3 separates its controls from the video output. Connect two displays to your PC before using it for playout. The second output can feed a monitor, projector, or switcher.
0. Connect two displays and choose the output
- Connect a control display and an output display (or projector) to the PC and turn both on.
- In Windows Settings → System → Display, check that both displays are detected and select Extend these displays. Do not duplicate the control screen onto the output.
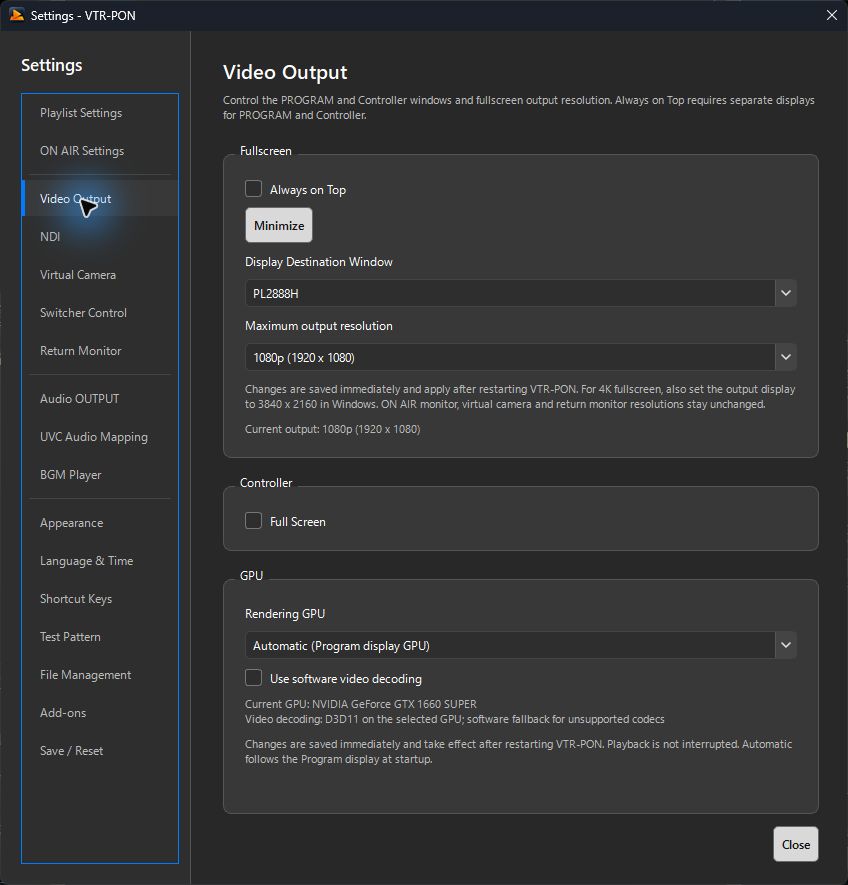
- Start VTR-PON3 and select the output display in Settings → Video Output → Display Destination Window. Keep the Controller on your control display.
- Check that the output display shows ON AIR video without the Controller buttons or playlist. If no image appears, check the destination in Video output settings.
Next, add a video, display its opening frame, and start playback. If you need sound, first configure the audio output as well.
1. Add a file
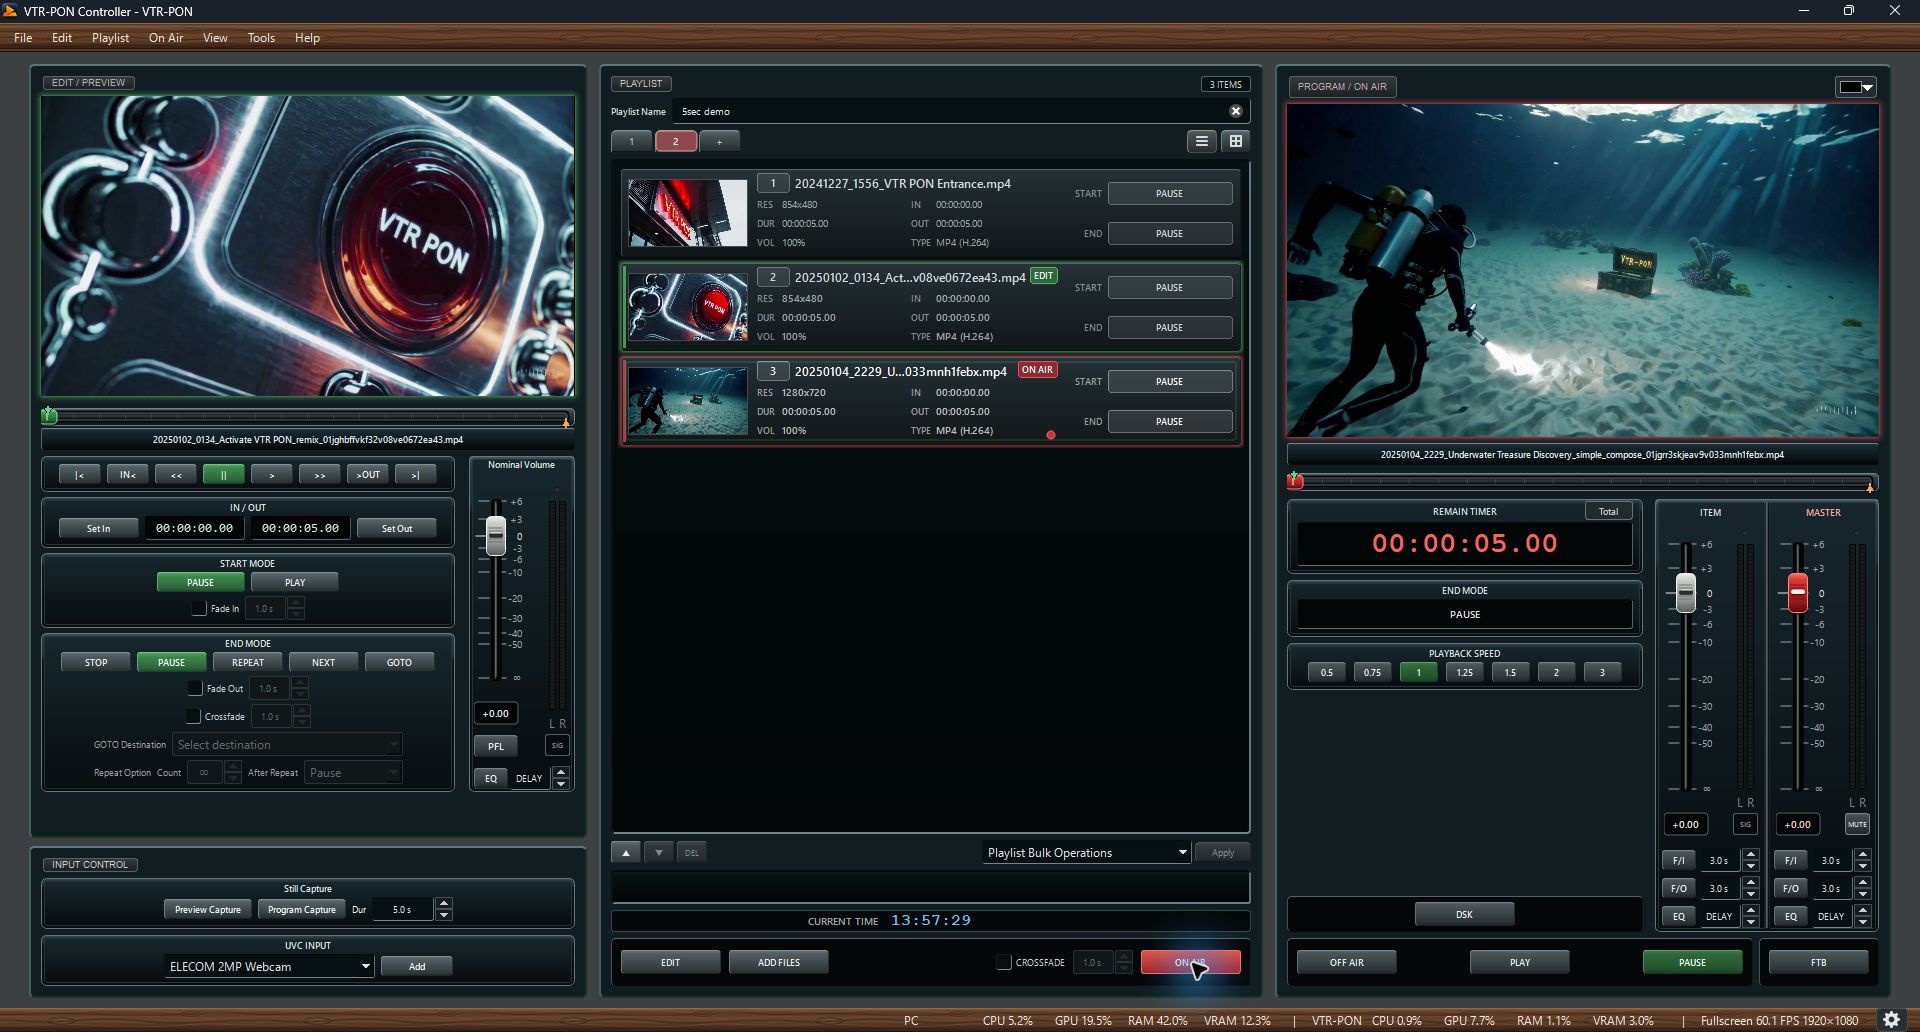
- Click ADD FILES. You can also use Add File in the File menu or Ctrl+F. Dragging files from File Explorer onto the playlist also adds them.
- Choose a video file and click Open in the file picker.
- Wait for the file name and thumbnail to appear in the playlist. You can add multiple files at once.
2. Check the media in EDIT
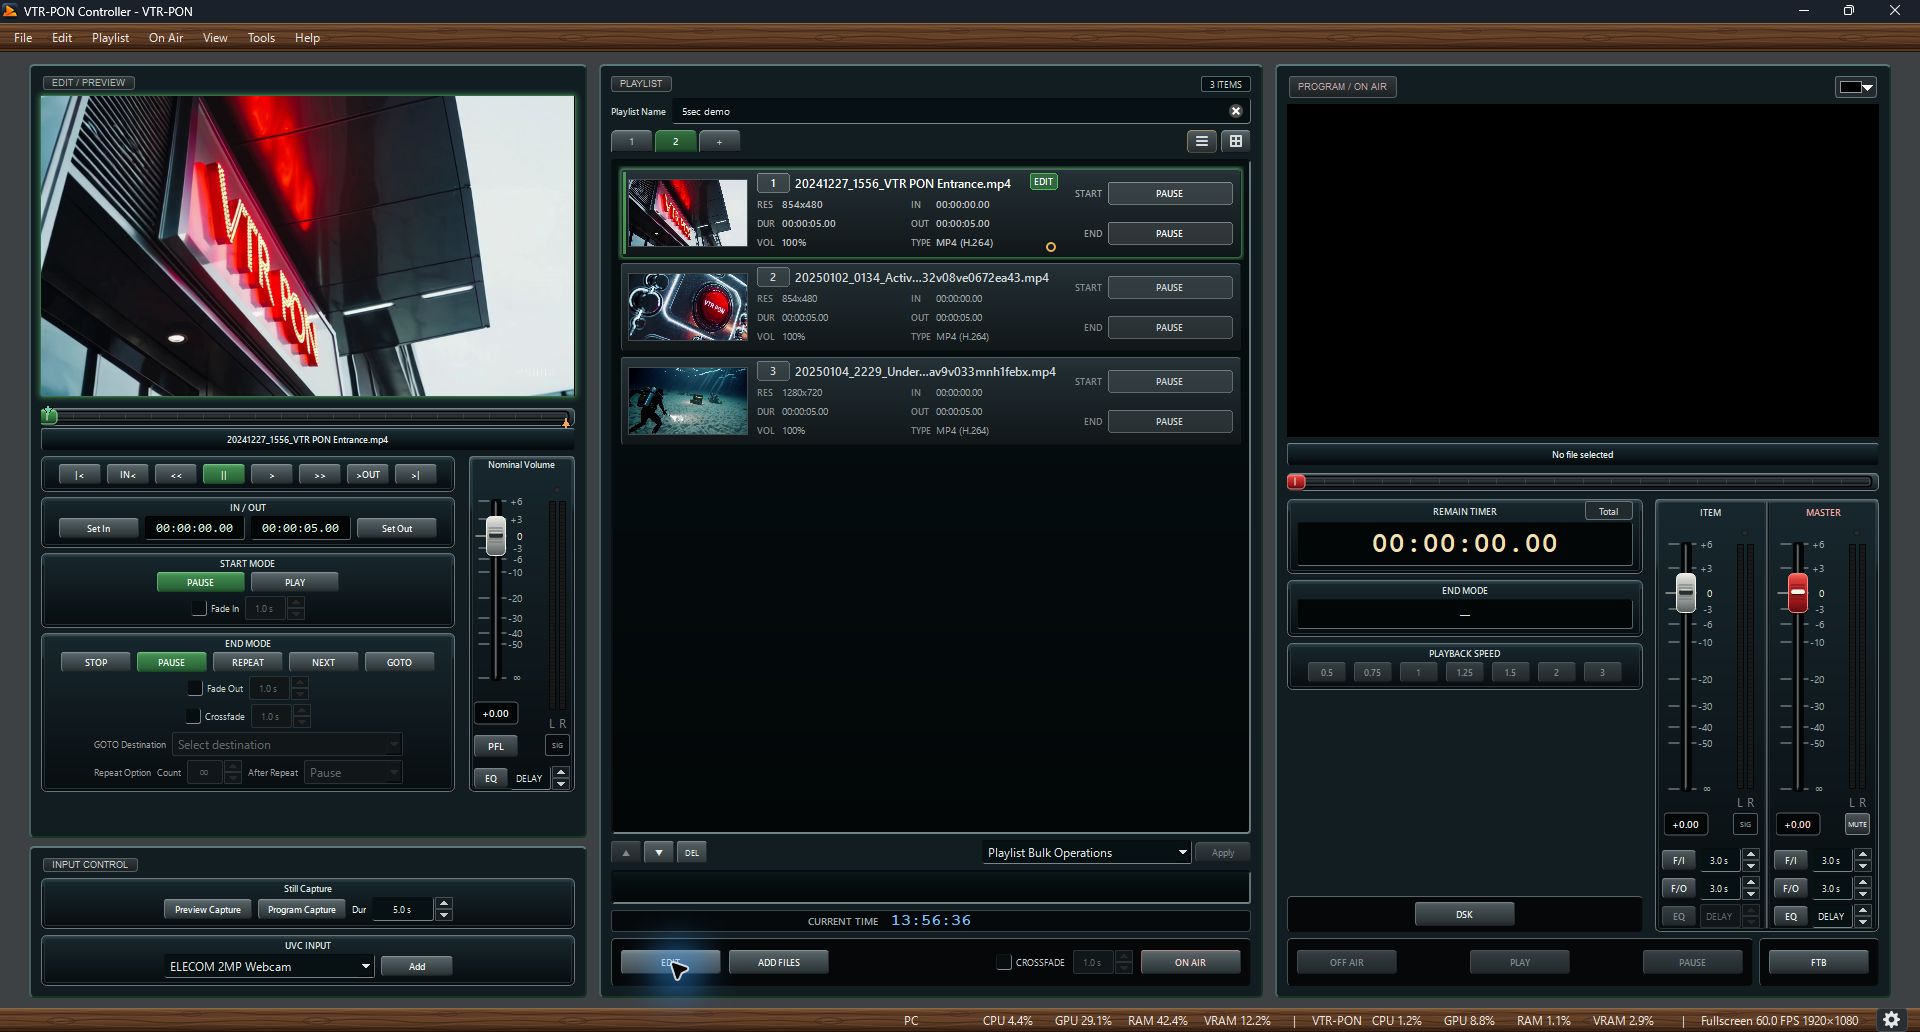
- Click the added item to select it, then click EDIT below the playlist (E).
- Once the video appears in EDIT on the left, use the playback button to check it. EDIT is for checking media before output. Playing ordinary video or audio here does not send it to ON AIR or the venue's fullscreen display. Configure PFL to listen to it.
- The defaults are START MODE = PAUSE and END MODE = PAUSE. The opening frame is held when the item goes ON AIR, and the last frame is held at the end. See the EDIT area to change this.
PPTX file import is available only in the Windows version.
Native PPTX playback is an exception. PowerPoint uses Windows audio output directly, so sound may play even while the item is being prepared for ON AIR. See PowerPoint and PDF for details.
3. Go ON AIR and play
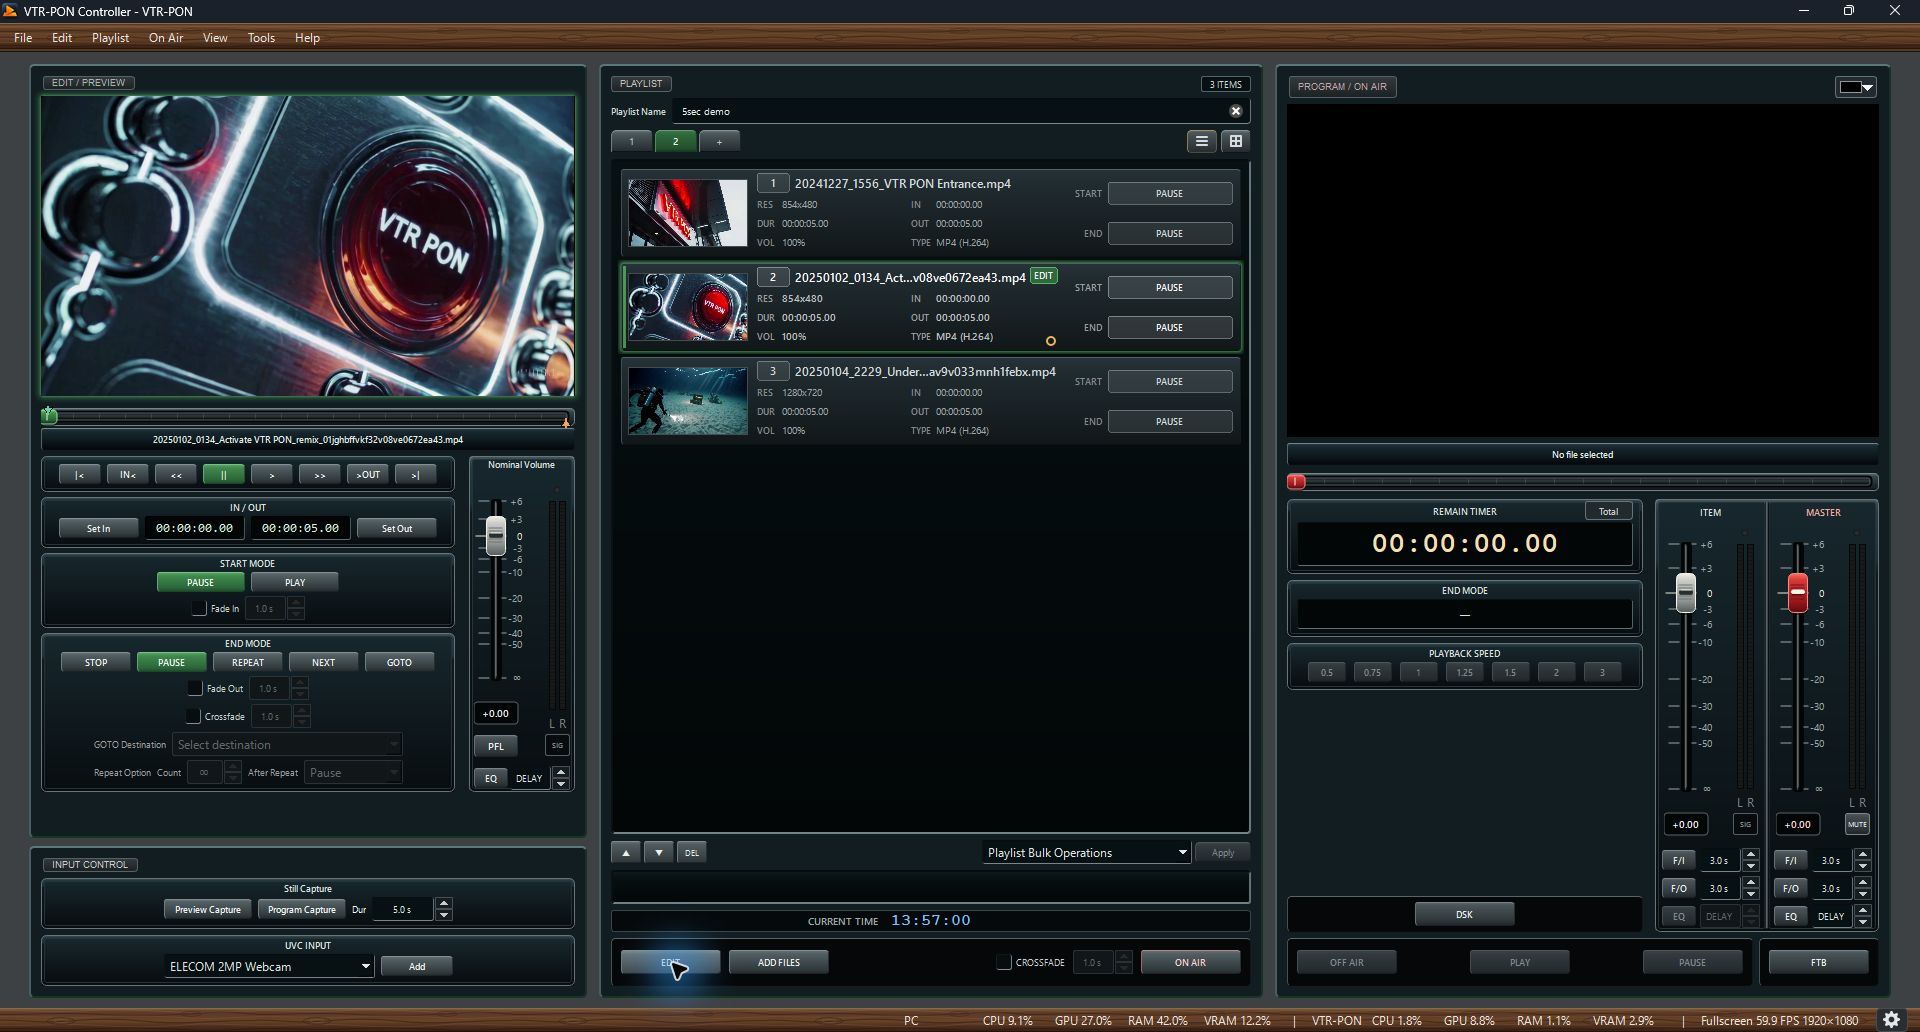
- Check that the intended item is selected, then click ON AIR at the bottom center (Enter). This is the key action that sends the selected media to the venue.
- Check that the item gains a red ON AIR indicator and that both ON AIR on the right and the fullscreen output change. Ordinary media enters the live video/audio path only at this point. With START MODE set to PAUSE, the opening frame is held and audio begins after PLAY.
- Click PLAY at the bottom right to start playback. Items with START MODE set to PLAY begin playing as soon as they go ON AIR.
4. Pause or finish
- Click PAUSE in ON AIR to pause, or PLAY to resume. Space also toggles playback and pause.
- Click OFF AIR to end output (Esc).
- To use the same sequence later, export the playlist.
Check: Output has ended when the ON AIR indicator clears. If you are using BGM, also check STOP in BGM CONTROL.
Troubleshooting
| Symptom | What to check |
|---|---|
| The item is ON AIR but does not move | Check that ON AIR shows an image. If START MODE is PAUSE, click PLAY. For Native playback of documents such as PPTX or PDF, use PREV / NEXT to change pages. |
| The item's thumbnail is red | The media cannot be loaded. The file may have been moved or deleted, use an unsupported codec, or be damaged. Check that the original opens, then export it in a supported format and add it again. |
| The video is black | Check the ON AIR indicator and FTB state. If EDIT also shows no video, check that loading is complete, the file is present, and the UVC device is connected. See Inputs for details. |
| There is no sound | Check that the media contains audio and is playing, then check ITEM / MASTER volume, MUTE, F/O, and FTB. Next, check the ON AIR audio output device and its volume. |
| No image appears on the venue display | Check that Windows detects both displays and uses Extend mode. If ON AIR in the Controller shows video, check the video output destination and the monitor's input selection. |
| Keyboard commands do not work | Move focus out of text fields such as the file name and try the on-screen buttons first. If you changed key assignments, check Keyboard shortcuts. |
PPTX file import is available only in the Windows version.
↑ Back to contents02Playlists
Where: PLAYLIST in the center of the Controller
Add media, arrange its playback order, and choose the item to operate. Selected, open in EDIT, and ON AIR are shown as separate states.
- Use + at the top to add a playlist and the numbered tabs to switch between them. Enter a helpful name in Playlist Name.
- Use ADD FILES to add media. Selecting an item makes it the target for EDIT and ON AIR operations.
- Drag items to rearrange them, or use ▲ / ▼ at the bottom (↑ / ↓). Select an unwanted item and click DEL (Delete) to remove it.
- Use the list/tile icons at the top right to choose a view. Use EDIT (E) to check content and ON AIR (Enter) to send it to the output.
Change playback behavior in bulk
Choose an action in Playlist Bulk Operations at the bottom, then click Apply. After changing playback behavior, check each item's START / END indicators.
| Item | User guide |
|---|---|
| Play List Once | Play all items in order and pause when the last item ends. |
| Repeat All | Play all items in order, then return to the first item and repeat. |
| Shuffle | Shuffle the item order. |
| Set BGM Mode | Convert to a dedicated BGM playlist. See BGM player. |
| Clear BGM Mode | Return a BGM playlist to a normal playlist. Stop BGM first. |
| Clear Playlist | Remove all items from the current playlist. |
| Delete Playlist | Delete the current playlist tab. The last remaining tab cannot be deleted. |
| Undo | Undo the previous bulk operation. |
Use Copy State / Paste State in the Playlist menu to copy an item's start and end behavior to another item. IN/OUT points and nominal volume are not copied, so check the destination item in EDIT afterward.
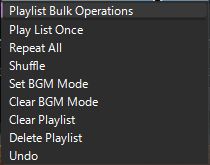
Check: Confirm that the media order and each item's START / END settings match your planned sequence.
03EDIT area
Where: EDIT on the left of the Controller
Prepare the playback range, start/end behavior, nominal volume, and sound settings for an item. First select it in the playlist and click EDIT to load it.
- Use the playback controls and seek bar to reach the desired start position. Click Set In.
- Move to the desired end position and click Set Out. You can also enter times in the IN/OUT fields.
- Under START MODE, choose PLAY (start immediately) or PAUSE (wait at the IN point). Set Fade In and its duration if needed.
- Under END MODE, choose what happens at the end. Set Fade Out / Crossfade and its duration if needed.
- Set each item's starting level with Nominal Volume. To listen beforehand, configure the PFL output, turn PFL ON, and play the item in EDIT.
- Use EQ for the item's output tone and DELAY for its output audio delay. See Audio output for details.
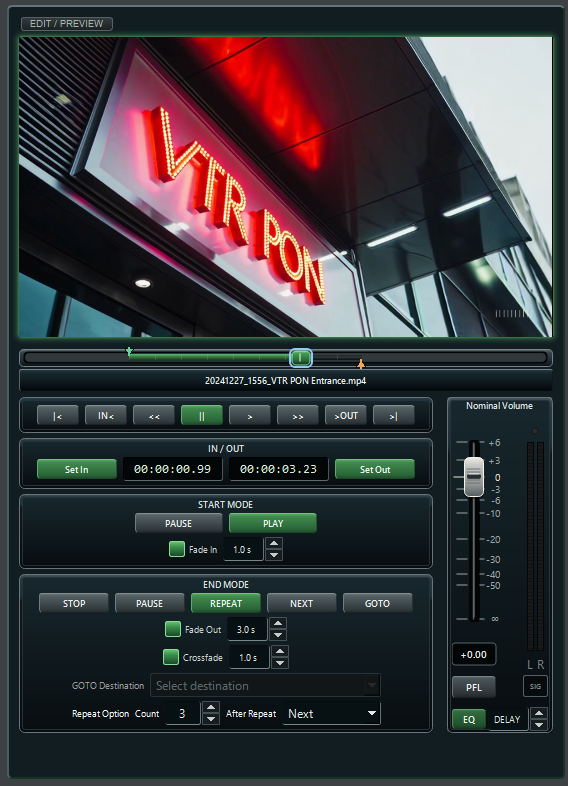
| END MODE | Behavior at the end |
|---|---|
| STOP | Stop playback. |
| PAUSE | Pause at the end. |
| REPEAT | Repeat the selected range. Set the repeat count with Count and the subsequent action with After Repeat. Count 0 / ∞ repeats indefinitely. |
| NEXT | Move to the next available item. |
| GOTO | Move to the item specified in GOTO Destination. |
Check: Play from the IN point through the OUT point and check the END MODE behavior. Unavailable settings, such as those unsupported during Native document playback, are disabled.
04ON AIR area
Where: ON AIR on the right of the Controller
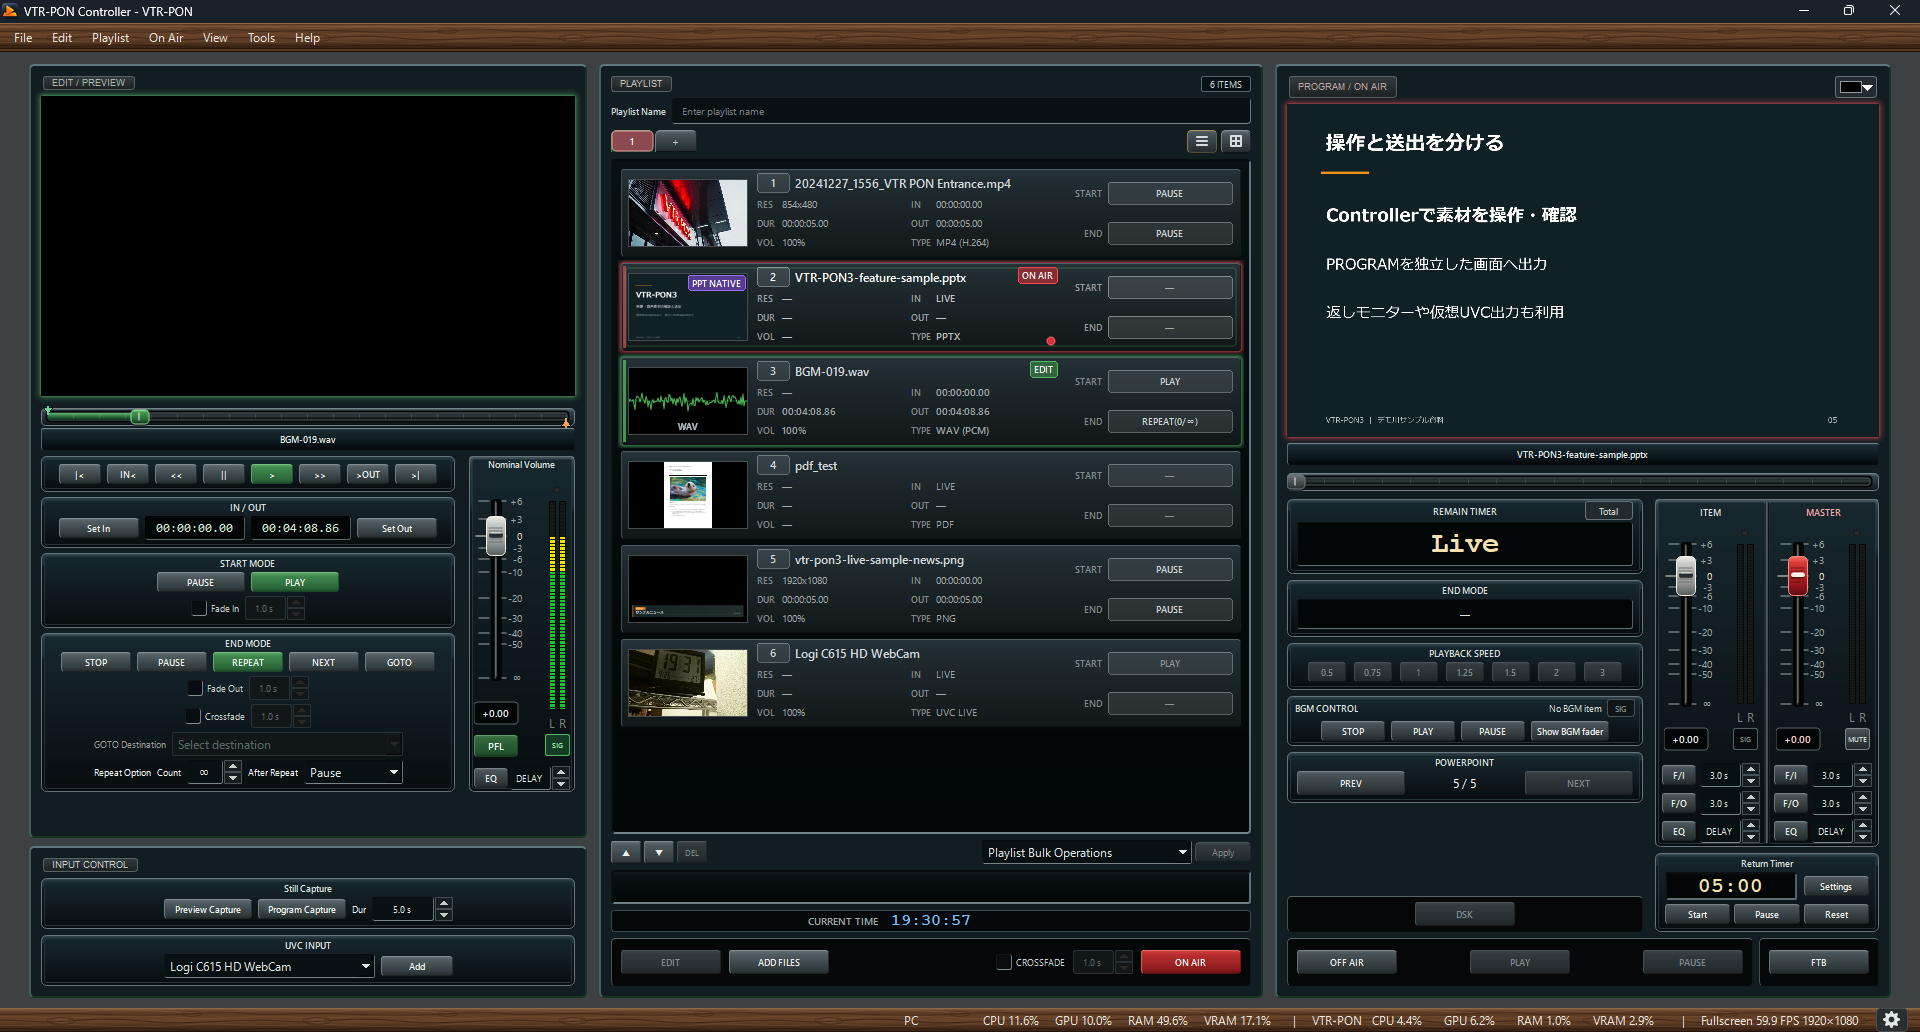
Control the video and audio currently being output. The next selected item and the current ON AIR item are separate, so check the file name and ON AIR indicator before switching.
- Select the next item in the playlist. It loads and prepares for ON AIR automatically. For converting or offline items, wait until ready or restore the source.
- To switch immediately, turn CROSSFADE OFF at the bottom center, then click ON AIR.
- To transition gradually, turn CROSSFADE ON, set its duration, and click ON AIR.
- During output, use the ON AIR PLAY / PAUSE controls and seek bar. REMAIN TIMER shows the current item's remaining time. Click Total at its upper right to show a total including other items.
- Click OFF AIR to end output.
The ON AIR player shows the same video as the fullscreen output display.
To send the same item ON AIR again from its beginning, enable the retake option in ON AIR settings.
Check: Confirm the new file name and red ON AIR indicator. If PAUSE is selected as in the screenshot, click PLAY at the required moment.
05Inputs: supported files and live sources
Where: ADD FILES / INPUT CONTROL at the bottom left
Add files with ADD FILES and live sources such as cameras with UVC INPUT.
| Media | Common supported formats |
|---|---|
| Video | MP4、MOV、WebM、MKV、AVI、MXF |
| Audio | WAV、MP3、FLAC、M4A、AAC |
| Still images | PNG and JPEG. Set the display duration when adding them. |
| Documents | PPTX and PDF. Choose a playback or conversion method when adding them. |
| Live video | Add UVC cameras and capture devices recognized by Windows through UVC INPUT. |
PPTX file import is available only in the Windows version.
Playback requirements can differ by codec and device even for the same extension. Check each source in EDIT before taking it ON AIR.
Video, audio, and still images
- Choose a file with ADD FILES.
- For PNG / JPEG, set the display duration before adding. Transparency in PNG and WebM is preserved.
- Load the item into EDIT and check the video/audio playback range or still-image duration. Set the required START / END MODE, then take it ON AIR.
PowerPoint and PDF
PPTX file import is available only in the Windows version.
Native PPTX playback and conversion require the desktop version of Microsoft PowerPoint installed on Windows. PDF playback and conversion do not require PowerPoint.
- Select a PPTX or PDF using ADD FILES.
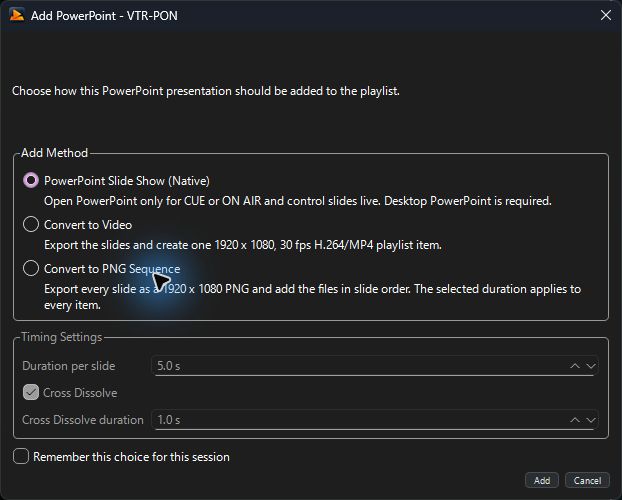
- Choose how to add it: Native for manual page changes, Convert to Video for timed continuous playback, or Convert to PNG Sequence for individual page items.
- For conversion, set the time per page. For video conversion, optionally set Cross Dissolve and the transition duration, then click Add.
- Wait for the item's conversion progress to finish before taking it ON AIR. For Native playback, use PREV / NEXT in ON AIR to change pages.
Native PPTX mode displays PowerPoint's rendered output in VTR-PON, including slides with animations and embedded video. PowerPoint audio goes directly through Windows and cannot be adjusted with VTR-PON's ITEM / MASTER / MUTE / FTB controls. It may be audible even while preparing for ON AIR, so check the audio destination before using a PPTX with sound at an event.
UVC cameras and capture devices
- Connect the device to Windows.
- Select the device in UVC INPUT at the bottom left and click Add.
- For audio, assign the matching audio input in UVC audio mapping.
- Select the new item, check the video in EDIT, then take it ON AIR.
Check: Confirm video and audio playback for files, or live video from the connected UVC device. If a device disconnects, restore the connection and explicitly take it ON AIR after it returns online.
06Audio output
Where: Settings → Audio OUTPUT / Nominal Volume and PFL in EDIT / ITEM and MASTER in ON AIR
Check audio in this order: the item's default settings during preparation, ITEM while ON AIR, then MASTER for the entire output. A separate BGM fader mixes background music.
1. Choose live and listening outputs
- Go OFF AIR and stop BGM if it is playing. Open Settings → Audio OUTPUT from the gear at the bottom right.
- Choose the live output device under ON AIR Output Device. System Default uses the Windows default output.
- Choose headphones or another listening device under EDIT PFL Output Device. PFL is unavailable with the default No Device selection.
- Check the current ON AIR output at the bottom and close settings. Changes made while ON AIR are deferred until OFF AIR and BGM has stopped.
- Open media with audio in EDIT, turn PFL ON, and play it. Once you can hear it, take it ON AIR and also check the live output.
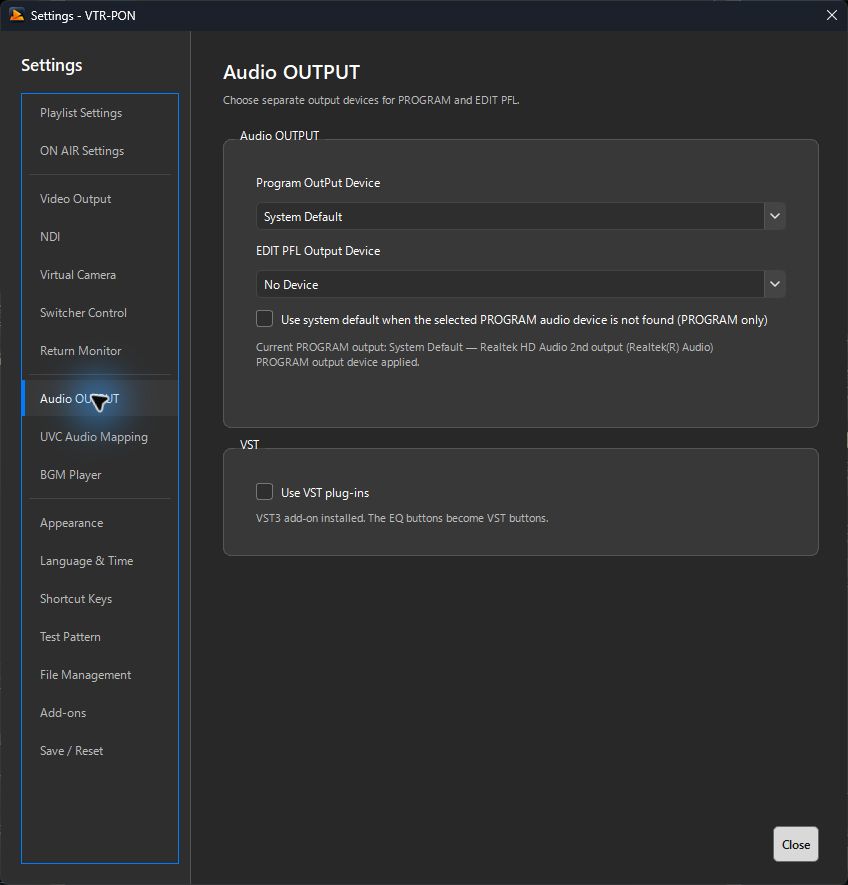
2. Prepare each item's nominal volume and tone
- Select an item in the playlist and load it into EDIT. Play it and adjust Nominal Volume to set its starting level the next time it goes ON AIR. This setting is saved per item.
- Click EQ in EDIT to adjust the item's output LOW (100 Hz), MID (2.5 kHz), and HIGH (10 kHz). Each band ranges from −15 to +15 dB; 0 dB is flat. Use Reset in the EQ window to restore the tone settings.
- If audio and video are out of sync, set the audio delay in frames using DELAY in EDIT. The range is 0–6 F; increase it when audio is ahead of video.
- To use PFL, configure a listening output and turn PFL ON. PFL lets you hear the source input; it does not check the live level after nominal volume or ON AIR ITEM / MASTER adjustments.
3. Control the ON AIR item and overall output
| Control | Effect |
|---|---|
| ON AIR ITEM fader | Adjusts only the current ON AIR item's volume. When switching items, playback starts from the new item's Nominal Volume. |
| ON AIR ITEM EQ / DELAY | Adjusts tone and audio delay for the current ON AIR item. Prepare a different item in EDIT. |
| ON AIR MASTER fader | Adjusts the overall final output volume. It remains effective across item changes and affects the final mix including BGM. |
| ON AIR MASTER EQ / DELAY | Adjusts tone and audio delay across the whole output, independently of item changes. Use this for venue compensation. |
| MASTER MUTE | Mutes the final live audio output. Unmuting leaves the fader position unchanged. |
| ITEM / MASTER F/I and F/O | Fades the relevant fader in or out over the displayed duration. Check the adjacent time setting before the event. |
4. Read the meters and adjust
The L/R meters beside each fader show left and right levels in dBFS. SIG in EDIT and ON AIR indicates audio input from the source. In ON AIR it measures before the ITEM fader, so it may stay lit with that fader lowered. ITEM meters show the level after the ITEM fader; MASTER meters show the final output. A red peak indicator means the level reached 0 dBFS. It stays lit briefly; if it lights repeatedly, lower the nominal volume or faders.
Fader values are in dB. 0 dB means no gain change, −∞ at the bottom is silence, and the upper limit is +6 dB. Fader travel follows a logarithmic curve for finer adjustment near 0 dB, rather than a linear change in level. Judge the level using the numbers, meters, and actual sound together.
PPTX file import is available only in the Windows version.
If ON AIR and PFL use the same device, listening audio goes to that output too. Choose a separate device to keep PFL out of the venue speakers. Native PPTX audio uses PowerPoint's Windows output and is outside these audio controls.
Check: Check the source SIG indicator, the ITEM / MASTER L/R meters, and then the sound from the selected speakers or headphones.
07DSK: overlay titles, images, and video
Where: Select an item in the playlist → DSK in ON AIR
DSK overlays another source on the ON AIR video. For titles that reveal the video underneath, use a transparent PNG image or WebM video. Media without transparency covers the whole frame.
- Add the overlay to a normal playlist. Set its duration and START / END MODE in EDIT.
- Take the base video or other source ON AIR.
- Select the overlay in the playlist and click DSK in ON AIR. The overlay appears after loading.
- DSK follows the item's START / END MODE. To control playback manually, use PLAY / PAUSE in the DSK section.
- Click DSK again to remove the overlay. To use a different item, turn DSK OFF before selecting the new one.
For example, a DSK item with START MODE = PLAY + Fade In and END MODE = STOP + Fade Out fades in over the base video, then fades out and disappears at its end.
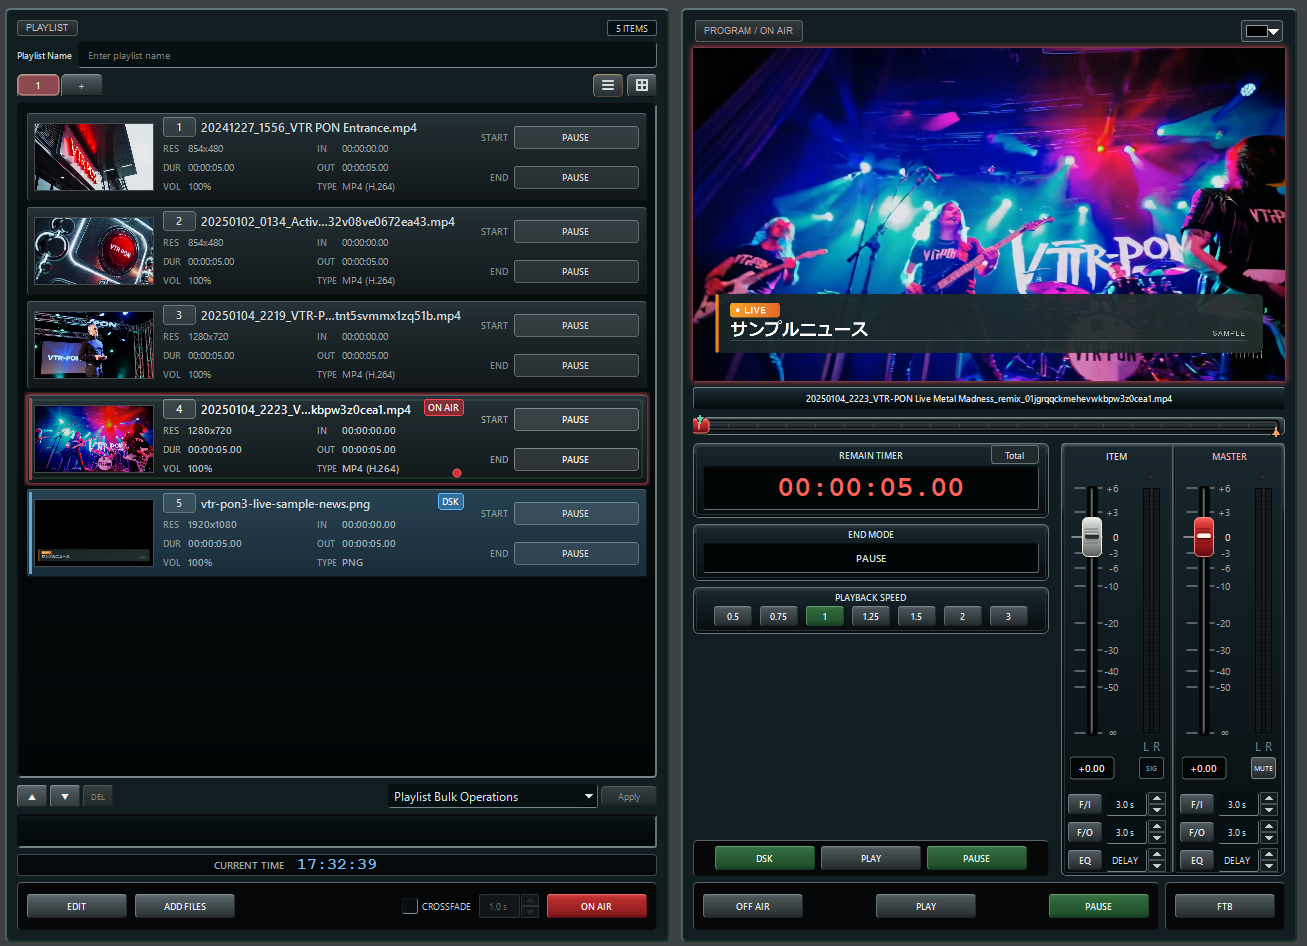
Check: Confirm that the title appears and the base video is visible through transparent areas. If an opaque rectangle covers the video, check that the source has transparency.
08FTB: fade video and audio out
Where: FTB at the bottom right of ON AIR
FTB (Fade To Black) fades ON AIR video to the selected background color and ON AIR audio to silence. It does not pause playback.
- Choose the player background color with the color button at the top right of the ON AIR player. The default is black.
- During output, click FTB at the bottom right. Check that video fades to the selected color and audio fades to silence.
- Click FTB again to restore video and audio.
- To end output itself, click OFF AIR.
This background color is also used before video appears with an item's START MODE Fade In and after it disappears with END MODE Fade Out.
If FTB is missing, check Disable the FTB button in ON AIR settings. To link the switcher's FTB too, configure Switcher control.
Check: Returning from the background color reveals the current playback position. To resume from a paused position instead, use ON AIR PAUSE.
09BGM player
Where: Settings → BGM Player / BGM CONTROL in ON AIR
Play background music from a dedicated playlist while outputting slides or video.
- Turn Show BGM Player ON in Settings → BGM Player, then close settings.
- Use + to create a playlist tab for BGM and add audio files.
- Choose Playlist Bulk Operations → Set BGM Mode → Apply. Check that the tab and items show BGM indicators.
- Select the first track and click BGM CONTROL → PLAY in ON AIR. The bulk action sets items to PLAY / NEXT for continuous playback. You can later change each item's START MODE / END MODE individually in EDIT.
- Use Show BGM fader to show the BGM fader and balance it with the video audio. Use PAUSE / STOP in BGM CONTROL to pause or stop music.
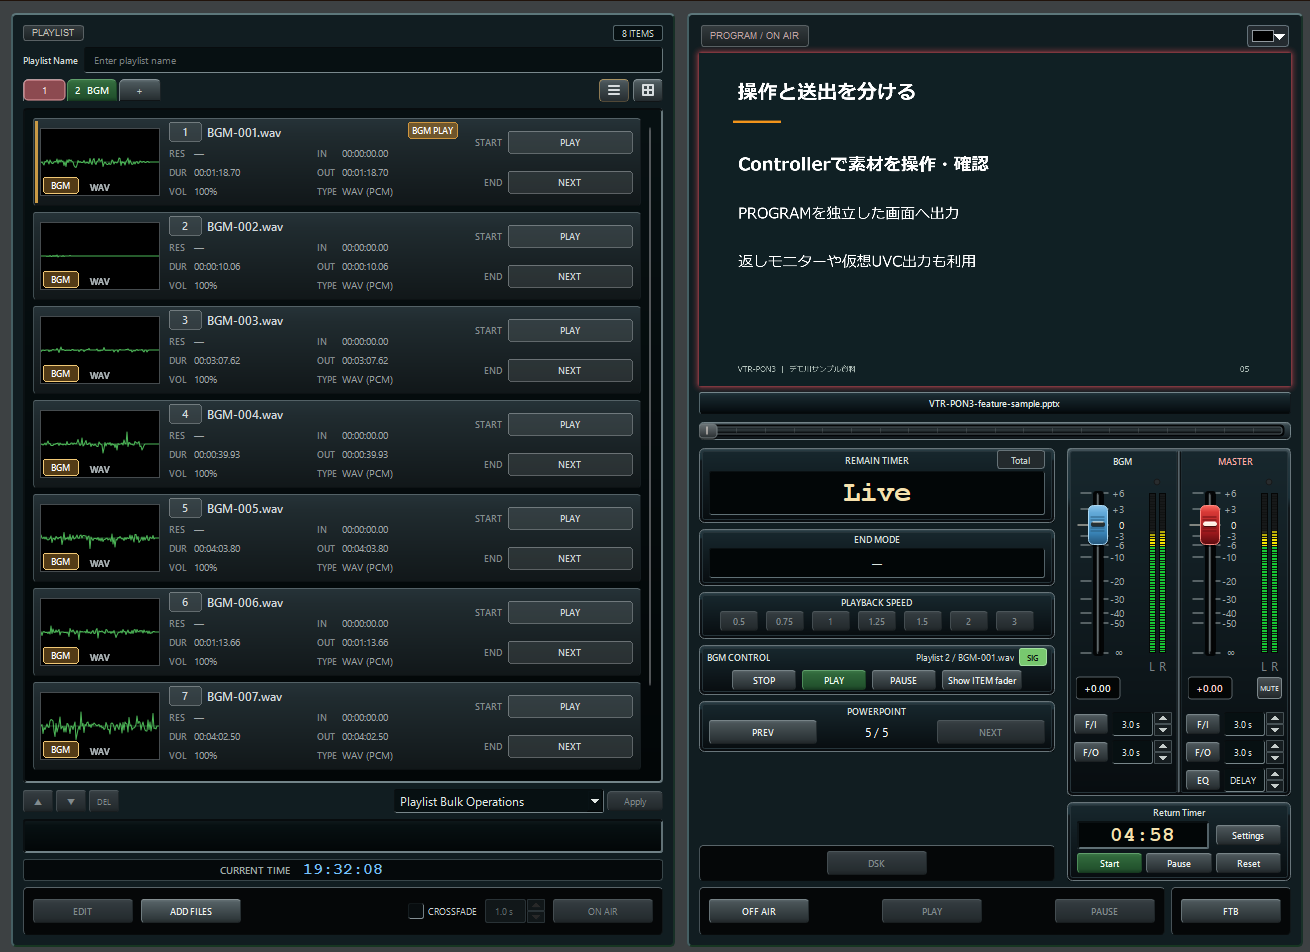
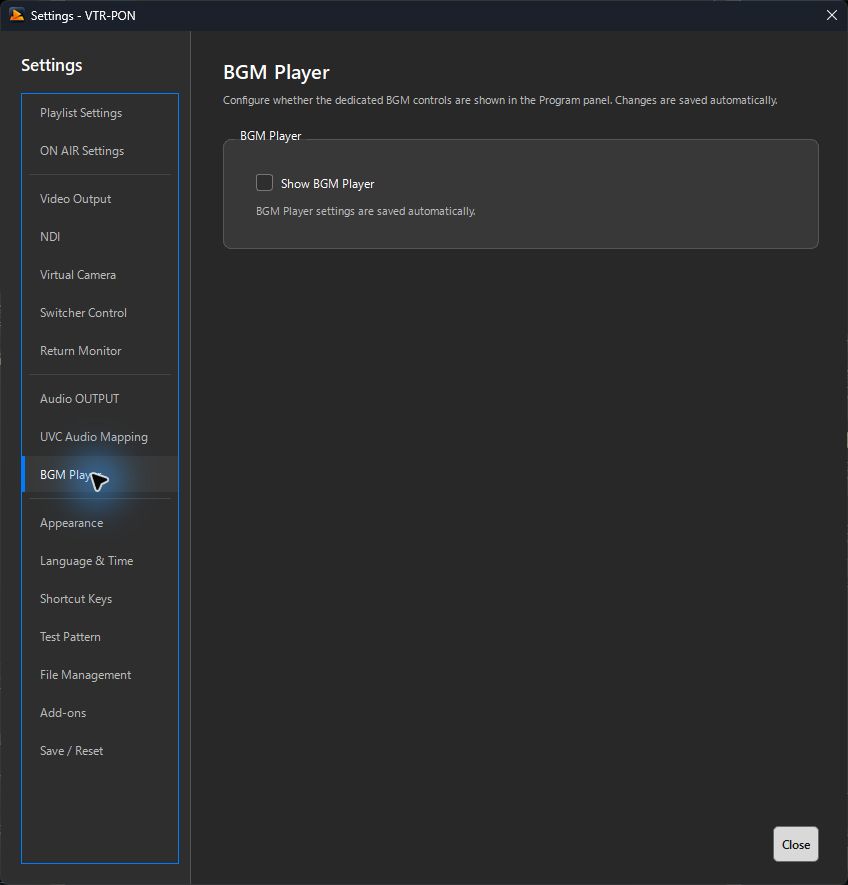
A BGM tab is dedicated to music. Put media for normal ON AIR or DSK use in a separate normal tab. Stop BGM before changing or leaving BGM mode.
Check: Confirm that BGM can play and stop while video stays ON AIR. Check ON AIR's OFF AIR and BGM's STOP separately.
10Confidence monitor window
Where: View → Return Monitor / Settings → Return Monitor
Show ON AIR video in a separate window with remaining time, file names, and other information to help run the event.
- Open the confidence monitor with View → Return Monitor.
- Open Settings → Return Monitor. Under Return monitor display, choose Window or a destination display.
- Turn Show information ON and choose the details you need: remaining time, file name, START / END MODE, playback speed, or document page count.
- Close settings and check the confidence monitor's video and information.
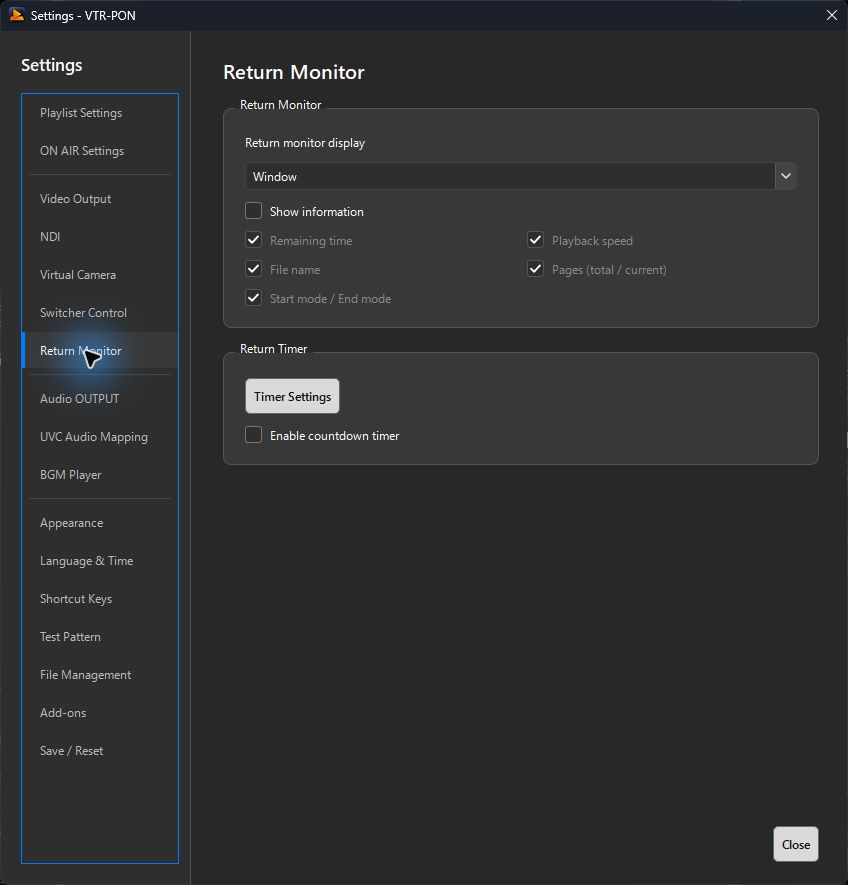
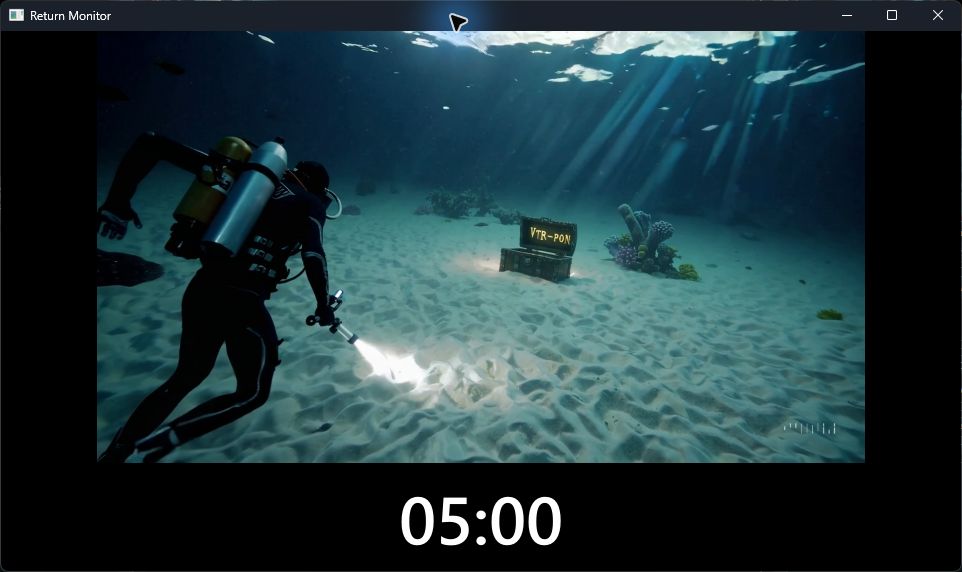
Check: Confirm the intended video and information appear on the confidence display. Choose the venue's ON AIR display in Video output settings.
11Confidence monitor timer
Where: Settings → Return Monitor → Timer Settings
Count down from a set duration and change text color as time runs out. You can also send a message to the confidence monitor.
- Turn Enable countdown timer ON in Settings → Return Monitor.
- Open Timer Settings and enter the starting minutes and seconds in Duration.
- Set the remaining-time thresholds and colors for First warning / Second warning, then click Save settings.
- Use Return Timer → Start in the Controller to begin, Pause to pause, and Reset to return to the configured duration.
- To show a message, type it in Message in Timer Settings and click Send. Click Delete to clear it.
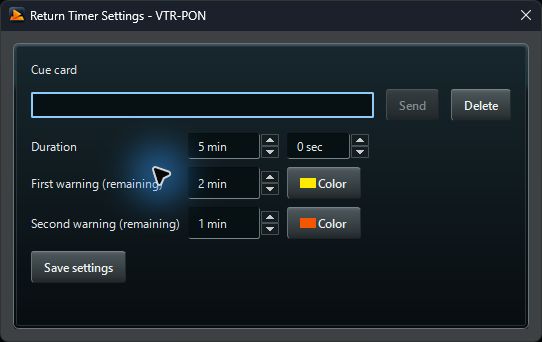
Check: Confirm the time counts down on the confidence monitor and changes color at each threshold. This timer is separate from the media's REMAIN TIMER.
12Import / export playlists and settings
Where: File menu
Playlists, which store media order, and app settings are saved as separate files.
| What to save | Export | Import |
|---|---|---|
| All playlists | File → Export Playlist | File → Import Playlist |
| App settings | File → Export Settings | File → Import Settings |
- To save the current contents, choose the appropriate Export command, then select a name and location for the JSON file.
- Before importing playlists, go OFF AIR and stop DSK and BGM. Wait for any ongoing document conversion or similar operation to finish.
- Choose the saved JSON with the matching Import command. This replaces the current contents, so export anything you need first.
- Check the imported result. For playlists, check item counts, order, and offline indicators; for settings, check output devices and displays.
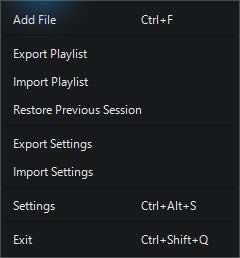
Playlist JSON does not contain the video or audio files themselves. To use it on another PC, bring the media files and check their paths. VTR-PON2 playlists and settings cannot be imported.
Use File → Restore Previous Session to recover the previous session. Save important show sequences separately with Export Playlist and a meaningful file name.
Check: Confirm that imported media opens in EDIT and output reaches the intended devices before resuming operation.
13Playlist settings
Where: Settings → Playlist Settings
- Open settings with the gear at the bottom right or File → Settings, then choose Playlist Settings.
- Under Open items in EDIT, choose whether an item opens when you press EDIT or when you select it.
- To select the next item automatically after output ends, turn Select the next item after ON AIR ends ON.
- Settings save automatically. Close the window and try selecting items and ending output.
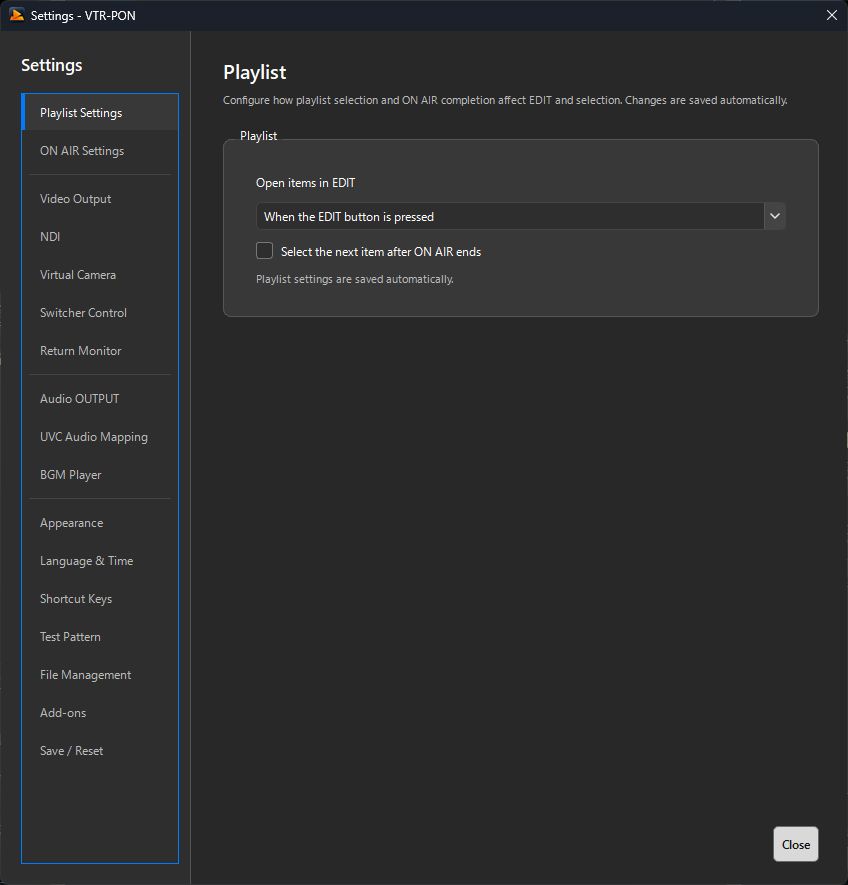
Automatically selecting the next item does not start playback. Use each item's END MODE, such as NEXT or GOTO, to automate the output sequence.
Check: Confirm that selecting an item changes EDIT only when you intend it to.
14ON AIR settings
Where: Settings → ON AIR Settings
- Open Settings → ON AIR Settings.
- To restart the current item from the beginning, enable Allow the same item to be taken ON AIR again while it is already ON AIR.
- To use a single button for both actions, enable Toggle ON AIR and OFF AIR with one button.
- Use Show playback-rate buttons to control the speed buttons and Disable the FTB button to hide the FTB controls.
- Settings save automatically. Close the window and check the Controller's controls and behavior.
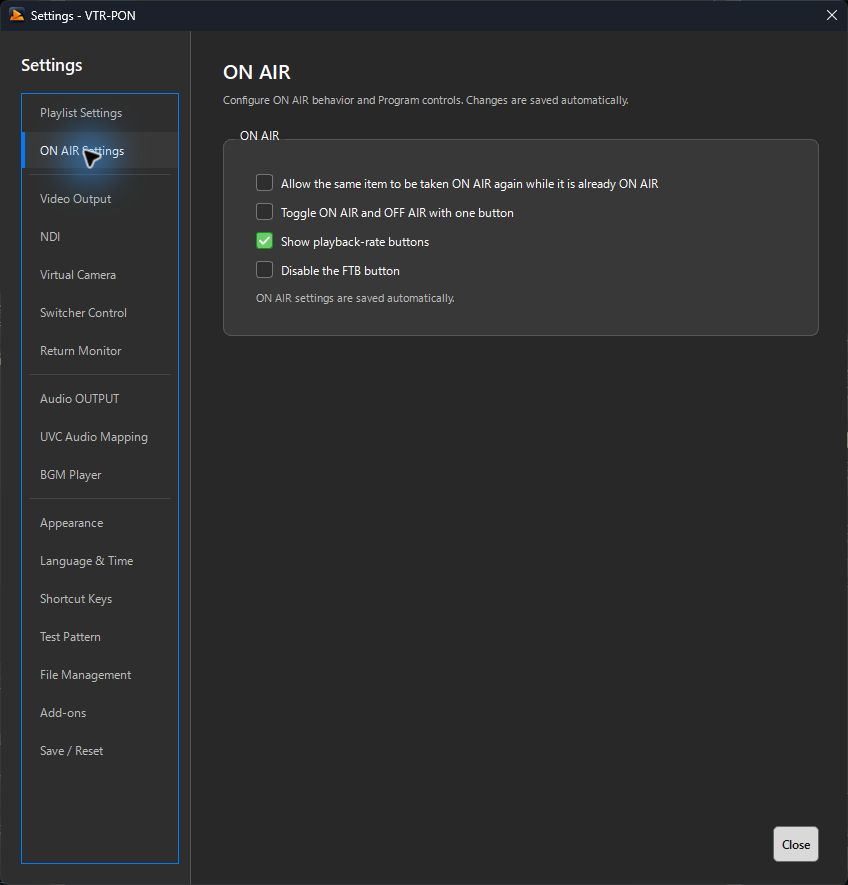
Check: Before the event, confirm whether pressing the same button retakes the item or takes it OFF AIR.
15Video output settings
Where: Settings → Video Output
- Connect the output monitor or projector and set Windows to extend across two displays. Then open Settings → Video Output.
- Choose the output display under Display Destination Window and keep the Controller on your control display.
- Choose the upper resolution limit under Maximum output resolution, then restart VTR-PON. For 4K, also set the target display to 3840×2160 in Windows.
- Use Always on Top, ON AIR Minimize, or Controller Full Screen as needed. Always on Top is used when the Controller and ON AIR are on separate displays.
- Set Rendering GPU to choose a GPU, or enable Use software video decoding, then restart.
Change the background with the color button at the top right of ON AIR in the Controller. For transparent or audio-only media, check the complete output including the background.
Check: Confirm that the actual output destination shows ON AIR and the venue cannot see the Controller controls.
16Virtual camera settings
Where: Settings → Virtual Camera
- Open Settings → Virtual Camera on a system where the virtual camera is registered. The installer registers it; extracting the ZIP alone does not. Registration, updates, and removal require administrator rights.
- Check that it is available, then turn Enable virtual camera output ON.
- In your meeting or streaming app, select VTR-PON (Windows Virtual Camera) as the camera.
- Take an item ON AIR in VTR-PON and check the receiving app's video.
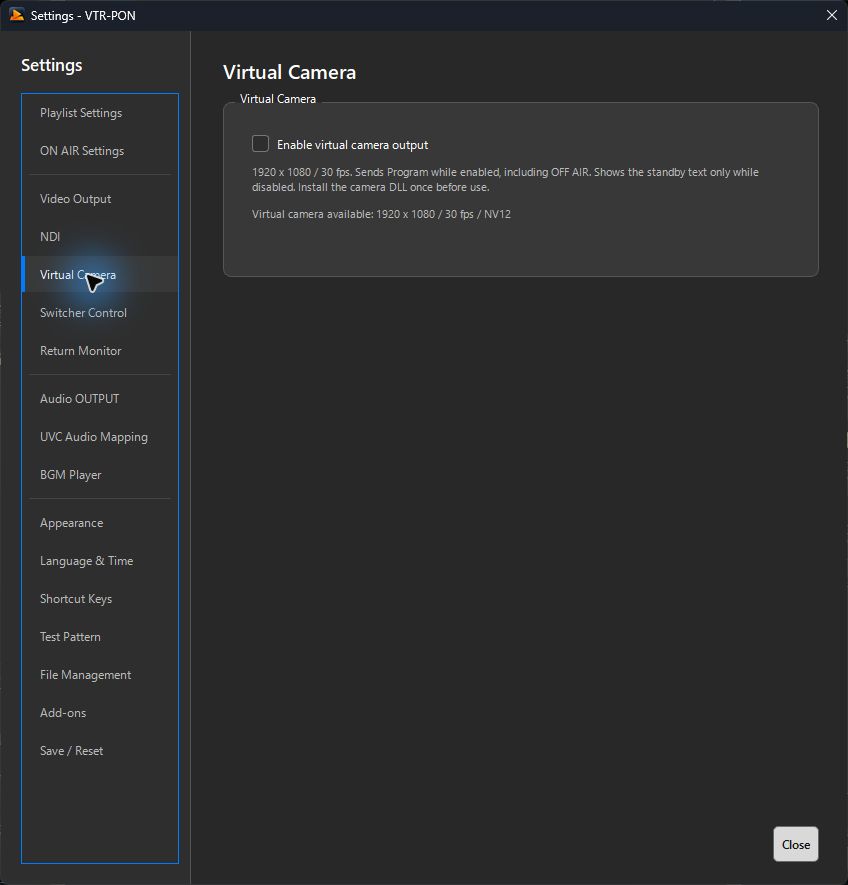
Virtual camera output does not include audio. Choose the microphone or audio input separately in the receiving app. While enabled, the virtual camera follows ON AIR output even when OFF AIR.
Check: Confirm ON AIR video appears in the receiving app's camera preview. If the camera is missing, check its registration and reopen the receiving app.
17Switcher control
Where: Settings → ATEM Control / Roland Control
Use the separate ATEM and Roland settings pages to link switcher input selection and FTB with VTR-PON ON AIR. The two integrations cannot be enabled simultaneously.
ATEM integration
- Install the ATEM add-on for your OS and matching ATEM Switchers Software, then restart VTR-PON.
- Connect the ATEM over USB and confirm that ATEM Setup recognizes it. Open Settings → ATEM Control and enable control.
- Set the ATEM input carrying the VTR-PON output, choose the required ON AIR / FTB links, and check the connection state. See ATEM add-on setup for details.
Roland integration
- Open Settings → Roland Control and select the model you are using. Model selection determines which connection settings and controls are available.
- For LAN models, connect the PC/Mac and switcher to the network and enter the device address, port and any required password. For USB MIDI, confirm that the OS recognizes the device. For RS-232 on Windows, configure the serial port and matching communication speed.
- Set the source number to the switcher input carrying the VTR-PON output, using the input mapping shown for the selected model.
- Enable Roland control and choose the required links: select the switcher input when VTR-PON goes ON AIR, take VTR-PON ON AIR when the input becomes live, or follow FTB. Only functions supported by the selected model can be enabled.
- Check the connection status, then test the chosen input and links with a short item. Use Operation Check to record send/receive, fade and reconnection results; save the JSON report or prepare a report email.
Supported connections, input numbering and receive/fade behavior vary by model. The Windows version includes 13 trial profiles. On Mac, V-1HD and RS-232 connections are outside the implemented scope; choose an enabled model in the list. Additional models and connection methods need real-device verification.
Help verify Roland switcher operation
If a switcher output is captured by VTR-PON through UVC, returning the VTR-PON output to that same switcher output creates a video loop. Check wiring and input numbers before enabling integration.
Confirm that only the intended input changes and that ON AIR / FTB links work in the required direction.
18UVC audio mapping
Where: Settings → UVC Audio Mapping
- Connect the video and audio input devices.
- Open Settings → UVC Audio Mapping and find the video device name.
- Choose its matching audio input from the drop-down. Select No Audio for a device without audio. Settings save automatically.
- Select the UVC item again and check the video/audio pairing in EDIT and ON AIR.
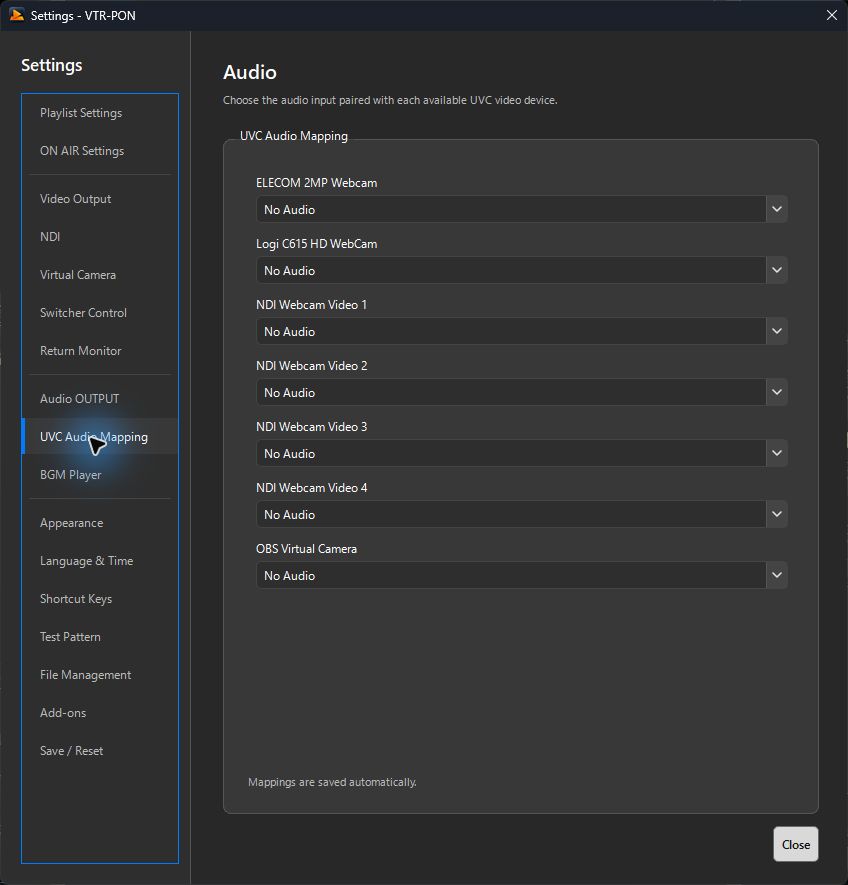
Check: Confirm that audio is not coming from another camera. Choose output speakers in Audio output, rather than here.
19Appearance
Where: Settings → Appearance
- Open Settings → Appearance.
- Select Studio Hardware, Material Dark, or VTR-PON Clasic under Controller skin, then click Apply.
- Adjust the UI text size slider. Text size is applied and saved as you change it.
- Close settings and check the playlist and buttons.
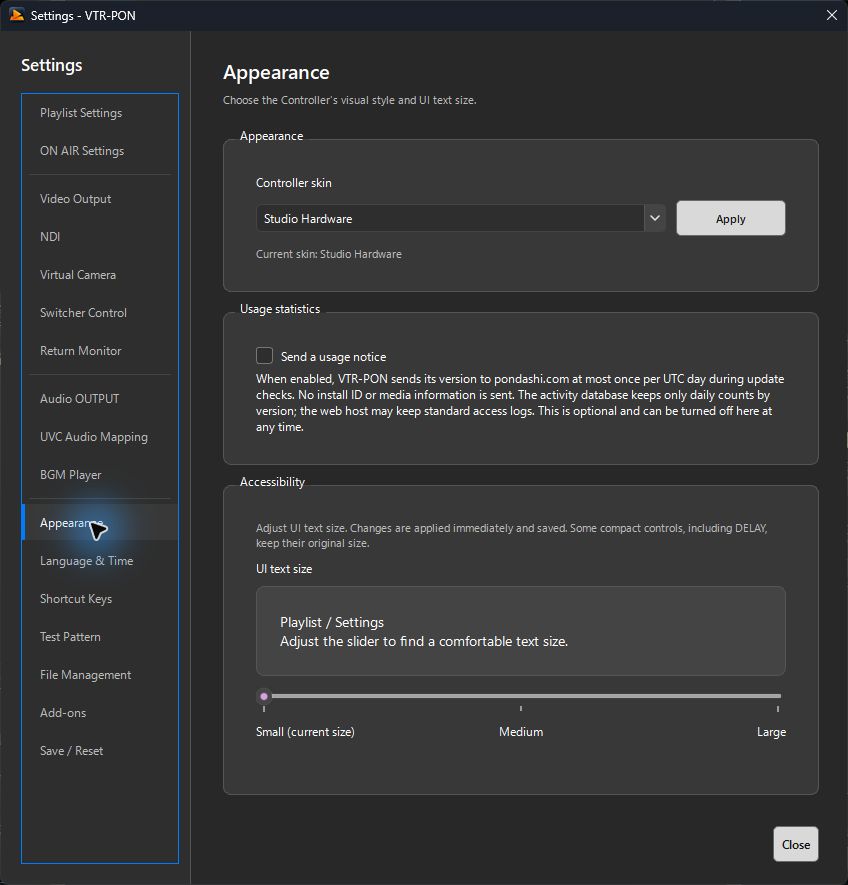
Check: Confirm text is readable at your usual display size. Playback speed, FTB, and BGM controls can be shown or hidden on their respective settings pages.
20Date, time, and language
Where: Settings → Language & Time
- Open Settings → Language & Time.
- Choose Japanese or English under Display language. The interface changes immediately and the choice saves automatically.
- Choose your region under Time zone. For Japan, select Asia/Tokyo.
- Click Synchronize time to synchronize the clock again.
- Set the initial remaining-time view with Default remaining timer, and the clock appearance with Current time font / font size.
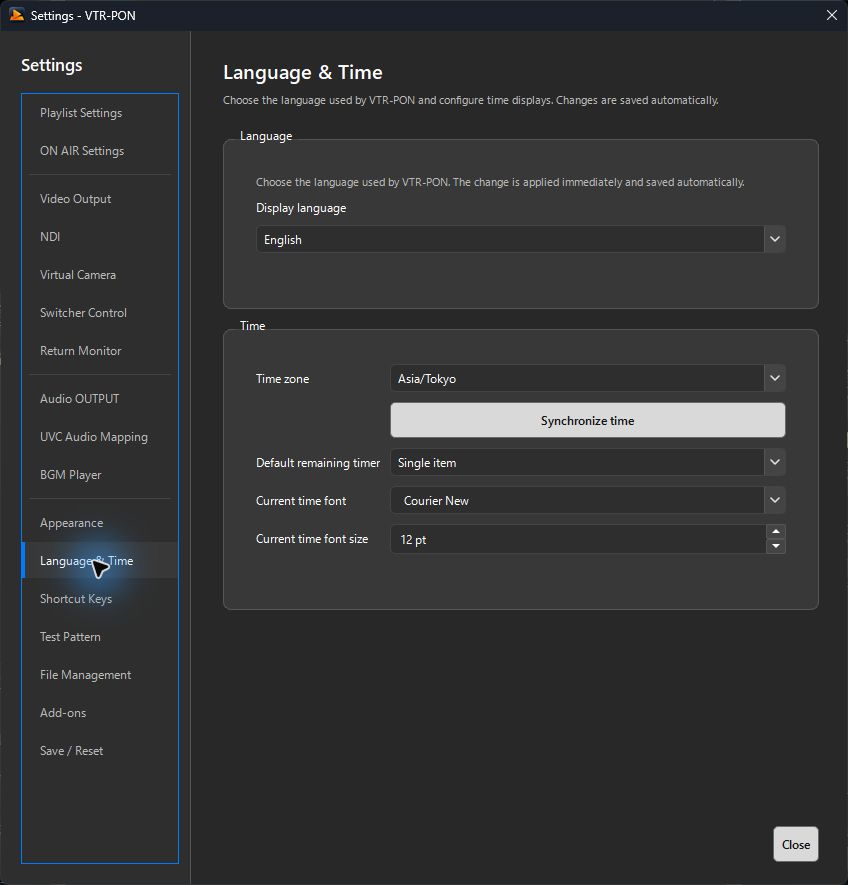
Check: Confirm CURRENT TIME at the bottom center and the ON AIR remaining-time display match your preferences.
21Customize keyboard shortcuts
Where: Settings → Shortcut Keys
- Open Settings → Shortcut Keys and find the action to change.
- Select Key 1 or Key 2 and press the desired key combination. Each action supports up to two shortcuts.
- Click × in a field to clear it. Clear both fields to disable shortcuts for that action.
- Click Save and Apply. If duplicate or unavailable combinations are reported, correct them and save again.
- Close settings, move focus out of text fields, and test the action. To reset assignments, use Restore Defaults, then Save and Apply.
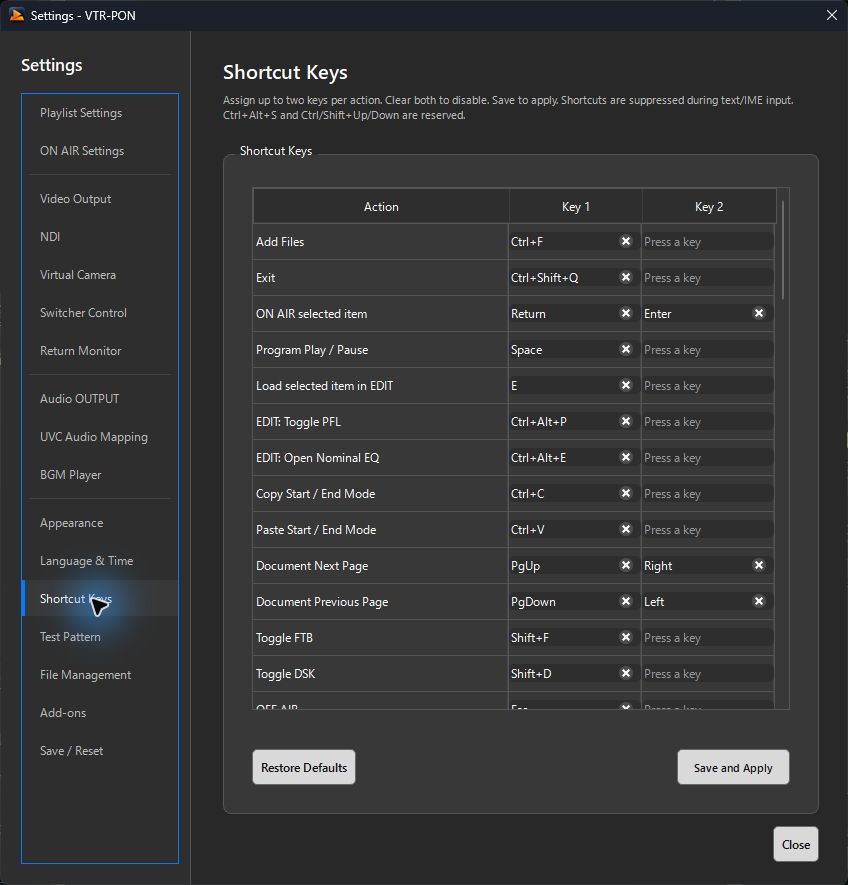
Playout shortcuts are suppressed during text entry and IME composition. Ctrl+Alt+S for Settings and Ctrl/Shift+↑/↓ are reserved.
Check: Confirm only the intended action runs. Keyboard shortcuts in this manual refer to the defaults.
22MIDI controller settings
Where: Settings → MIDI Control
Assign ON AIR, play/pause, and other actions to MIDI controller buttons, and volume controls to faders or knobs. Connect a device recognized by Windows as a MIDI input. MIDI control is disabled by default with no assignments.
Connect and assign buttons
- Connect the MIDI controller to the PC and open Settings → MIDI Control. If the device requires a driver or transmission-mode setup, follow its manual first.
- Choose the device under MIDI input. Click Refresh if it is missing. Check for the connected status message.
- Select an action, click MIDI Learn, then press the device button once. Normally a Note input is detected. For a CC button, first set the input type below the list to CC, then click MIDI Learn.
- Check that the row's MIDI assignment shows Note or CC, a channel, and a number. Select another row and repeat to assign other actions.
- Check Enable MIDI control and click Save and Apply. Confirm the saved-status message, close settings, and test the buttons.
MIDI actions are suspended while settings or dialogs such as file pickers are open. Input monitoring and MIDI Learn work even with Enable MIDI control OFF. Save and close dialogs before testing actions.
Assign volume to faders and knobs
Select Master volume, ON AIR item volume, Nominal volume (EDIT), or BGM volume, click MIDI Learn, and move the fader or knob. Volume controls use CC input. Configure the options below to match your device's transmission mode, then save and apply.
| Item | How to configure |
|---|---|
| Absolute (0–127) | For faders and knobs sending positions from 0 to 127. With the default volume range, CC 0 is silence and 127 is +6 dB, following the same scale as the on-screen fader. |
| Relative | For rotary encoders sending direction and movement. Match the device setting: two's complement (1 / 127), binary offset (65 / 63), sign bit (1 / 65), or sign bit 2 (65 / 1). Choose the mode after MIDI Learn. |
| Pickup | For absolute input. When enabled, volume stays unchanged until the physical control catches up with the on-screen level. Use this to avoid sudden jumps caused by different positions. It is OFF by default, so movement applies immediately. |
| Reverse and Volume range | Enable Reverse to invert movement. Set minimum and maximum volume with Volume range. For example, a 0 dB maximum prevents a fully raised fader from reaching +6 dB. The bottom of absolute input remains silence even if the minimum is changed. |
Change or clear assignments
You can enter type (Note / CC), channel (Ch 1–16), and number (# 0–127) manually. Learning the same type/channel/number for another action moves it from the old action to the new one. Manually entered duplicates cannot be saved; clear the unwanted assignment.
Select a row, click Clear assignment, then Save and Apply. To stop all MIDI actions, uncheck Enable MIDI control and save. Use Export Settings to keep a backup.
Troubleshooting
| Symptom | What to check |
|---|---|
| The device is missing or cannot connect | Check USB, device power, and drivers, then click Refresh. If the input cannot be opened, close other apps using the same input and check the connection. |
| Input appears but is not assigned | Select an action row and click MIDI Learn before operating the device. Set the input type to CC first for CC buttons. For volume rows, use a fader or knob that sends CC. |
| An assigned button does nothing | Check that MIDI control is enabled and saved, then close dialogs and try again. Check that the same on-screen action is available for the current media and selection. |
| Volume does not move or moves the wrong way | If Pickup is enabled, move the physical control to the on-screen level. Also check absolute/relative mode, Reverse, and Volume range. |
For linked video switching with ATEM or Roland devices, use Switcher control.
Check: Close settings and confirm that assigned buttons perform the intended actions and faders or knobs change only the intended volume.
23Test patterns
Where: Tools → Test Pattern / Settings → Test Pattern
- Open Tools → Test Pattern and choose a pattern. It is added to the current playlist.
- Check the new item in EDIT, then take it ON AIR to test displays and audio paths.
- To add your own patterns to the menu, use Settings → Test Pattern → Add Files.
- Use Move Up / Move Down to reorder the list and Remove from List to remove entries. Use Restore Bundled Items to restore the included list.
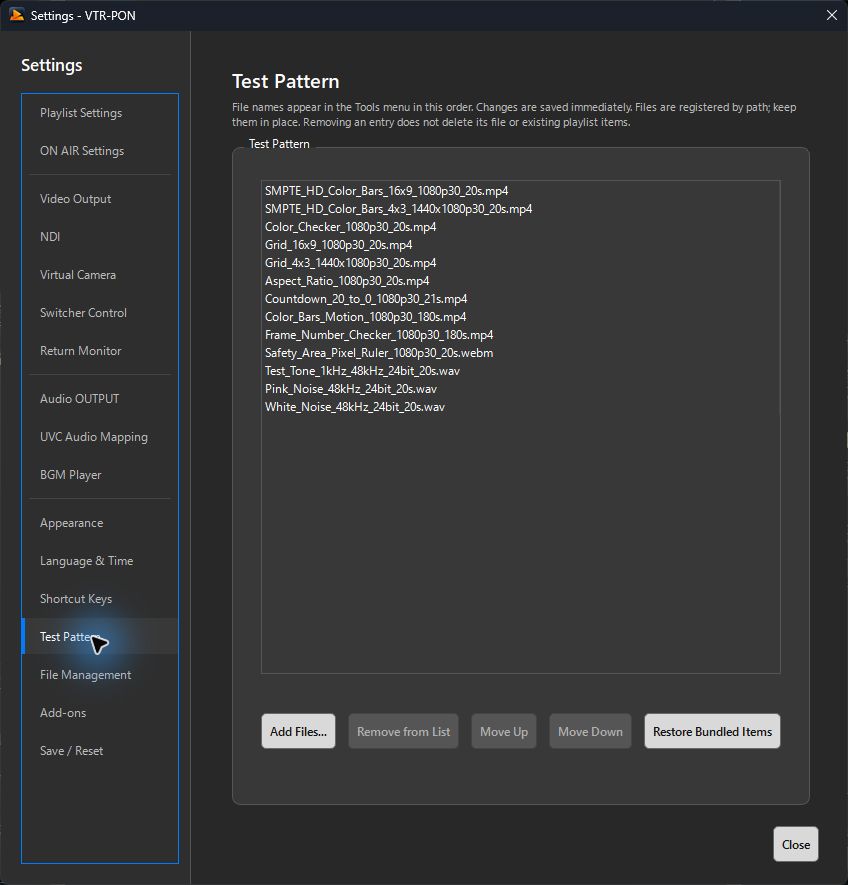
Remove from List removes a menu entry, not the original file or existing playlist items. Check output volume before playing audio test media.
Check: Confirm the pattern appears on the intended display and audio tests are heard from the intended output.
24Still capture
Where: INPUT CONTROL → Still Capture at the bottom left of the Controller
- Show the video to capture in EDIT or ON AIR. Pause at the desired position to capture a specific frame.
- Set the new still-image item's display duration in seconds under Dur.
- Click EDIT Capture for EDIT video or ON AIR Capture for ON AIR video.
- Wait for saving to finish and check that the still image was added to the playlist open when you captured it.
- Open the new image in EDIT and check its content and duration before use.
Images are saved as PNG. Change the folder under Settings → File Management → Directory for saving still captures. The new folder applies to subsequent captures.
Check: Confirm the added image shows the intended frame. If video has not loaded yet, wait for it to appear and capture again.
25Save and reset settings
Where: Settings → Save / Reset
Most settings save automatically. Where a save or apply button appears, use it to confirm changes: Apply for skins, Save and Apply for shortcuts and MIDI, and Save settings for the confidence timer.
- To back up settings, use Settings → Save / Reset → Export Settings to File and save a JSON file.
- To restore saved settings, choose Restore Settings from File and load the matching settings JSON.
- To restore defaults, finish output and export any needed settings and playlists before clicking Reset.
- After resetting or restoring, check audio and video outputs, language, and integrated devices. Restart VTR-PON if any changed setting requires it.
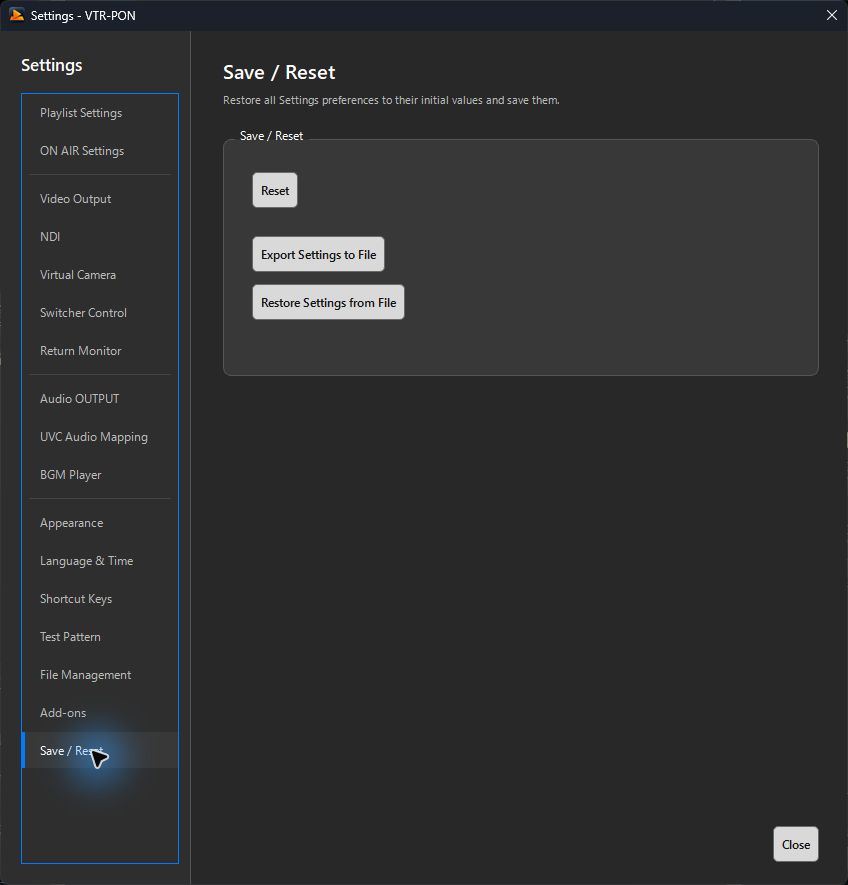
Reset changes settings to their defaults immediately. It applies without waiting for a confirmation dialog, so export any needed settings first. Save and restore playlists separately from the File menu.
Check: Check output destinations and shortcuts after resetting. Test adding a short item, EDIT, ON AIR, and OFF AIR before resuming operation.
26Additional menu operations
Where: File / Edit / Playlist / On Air / View / Tools / Help at the top of the Controller
The menu bar also provides the main actions. File commands are covered in Getting started and Import / export; bulk actions and Copy State / Paste State in Playlists; and ON AIR, FTB, and DSK in their own sections. This section covers additional actions whose buttons may be harder to find.
- Open the appropriate menu at the top of the Controller.
- Check the target in the table below before choosing an action. During output, pay particular attention to Item / Master / BGM in the On Air menu.
- Check the result in ON AIR, the playlist, or the information display.
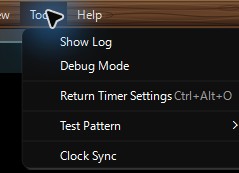
| Menu | When and how to use it |
|---|---|
| File → Restore Previous Session | Restore the previous session's playlists. Save important sequences separately with Export Playlist. |
| Edit → Reset | Unload the item from EDIT and stop PFL. The same Edit menu also provides IN/OUT and mode changes. |
| On Air → Fade In/Fade Out | Fade Master, Item, or BGM. Confirm the target and ON AIR duration setting first. See Audio output. |
| View → Fullscreen | Use Always on Top to keep the output window in front, Minimize to minimize it temporarily, and Display Destination Window to choose its display. See Video output settings. |
| View → Controller → Full Screen | Toggle the Controller itself to fullscreen. Check the two-display arrangement so the control display and output are not confused. |
| Tools → Show Log/Debug Mode | Use Show Log to inspect operation logs. Enable Debug Mode when detailed diagnostic logs are needed. |
| Tools → Clock Sync | Try network time synchronization manually. You can also use Synchronize time in settings. |
| Tools → Timer Settings | Available only when the confidence countdown timer is enabled. Set its duration, warning colors, and message. See Confidence monitor timer. |
| Help → Check for Updates | Check whether a newer version is available. |
See Test patterns for Tools → Test Pattern, and Confidence monitor for View → Return Monitor. Use File → Exit to quit.
Check: Confirm only the intended target's view or state changes. Logs and update checks show results in the opened window or notification.
27Install, update, and remove add-ons
Install the add-ons you need to use ATEM, NDI, VST3, and DeckLink features.
- Download an add-on from Add-on downloads and prepare the requirements listed under Before you start.
- In the app, open Settings → Add-ons → Install from Package and select the downloaded .vtrponaddon file.
- Review the displayed terms and click Agree and Install. Choose Yes at the restart prompt to restart automatically after the required operations finish. If you choose No, restart manually later.
You can also click Check Available Add-ons in Settings → Add-ons and choose Install. Update and remove add-ons from the same screen.
After installation, open the feature's settings
| Add-ons | Capabilities | Settings location |
|---|---|---|
| ATEM | Link ON AIR, ATEM input switching, and FTB | Settings → Switcher Control |
| NDI | Receive network video/audio and send ON AIR output | Settings → NDI |
| VST3 | Apply VST3 effects to audio | Settings → Audio OUTPUT → Use VST plug-ins |
| DeckLink | Input and output video/audio with DeckLink | Settings → DeckLink |
If settings are missing, check that installation completed and the app was restarted. If required ATEM, NDI, or DeckLink software is missing, check the diagnostics in that settings page and follow the official installation guidance.
See Add-on details for requirements, licenses, and file verification.
↑ Back to contents28ATEM add-on: switcher integration
Where: Settings → ATEM Control
Connect a Blackmagic Design ATEM switcher to switch its input when VTR-PON goes ON AIR. ATEM switching can also trigger VTR-PON ON AIR, and VTR-PON's FTB can control ATEM FTB.
Before you start
You need an ATEM device, a USB connection, and compatible ATEM Switchers Software. Install the ATEM add-on, restart the app, and check that ATEM Setup recognizes the device. See ATEM requirements for software versions.
Connect and configure integration
- Connect the PC and ATEM by USB and open Settings → ATEM Control.
- Turn Enable Blackmagic ATEM control ON in the ATEM section and check the connection status.
- Set ATEM input number to the input carrying VTR-PON video.
- Enable the links you need from the table below. Before triggering ON AIR from ATEM, select the intended item in VTR-PON's playlist.
- Test ON AIR and FTB with a short item to check the input and integration direction.
| Integration | Behavior |
|---|---|
| VTR-PON → ATEM | When VTR-PON goes ON AIR, switch ATEM Program to the specified input. |
| ATEM → VTR-PON | When ATEM Program switches to the specified input, take the selected playlist item ON AIR. |
| FTB integration | Apply VTR-PON's FTB state to ATEM. FTB changes made on ATEM are not sent back to VTR-PON. |
ATEM control uses USB. It cannot be enabled at the same time as Roland control; enabling one disables the other. See Switcher control for Roland instructions.
The ATEM add-on controls the switcher. Use UVC input separately to capture its video. Sending captured ATEM output through VTR-PON back into the same ATEM output creates a repeating video loop. Check return inputs and wiring.
Check: Confirm connected status, the ATEM input number, and ON AIR / FTB integration. If connection fails, check USB, recognition in ATEM Setup, and required-software diagnostics in settings.
29NDI add-on: network video and audio I/O
Where: Settings → NDI / INPUT CONTROL source list at the bottom left
Add NDI sources on the same network to the playlist and take them ON AIR as live media. You can also send ON AIR video and audio to NDI-compatible apps or devices.
Before you start
Install the NDI add-on and NDI Runtime 6 (64-bit), then restart the app. Connect senders and receivers to the same network and allow NDI discovery and communication through the firewall. See NDI requirements for required software.
Receive NDI video and audio
- Start NDI output on the sending app or device.
- Turn Enable NDI input ON in Settings → NDI and wait for source discovery.
- Choose the NDI source in the Controller's bottom-left input list and click Add to add it to the playlist.
- Open the item in EDIT to check video. Use PFL to listen. Once checked, click ON AIR to output it.
Send ON AIR over NDI
- Turn Enable NDI output ON in Settings → NDI.
- Set the Source name and select the video outputs you need. Use Composite for normal output.
- Check the output status and sender name, then choose that source in the receiving app or device.
- Take an item ON AIR and check video and audio at the receiver.
| Video output | Purpose |
|---|---|
| Composite | Send the finished image, including the background color. |
| Fill/Key | Send color video and a monochrome key separately for compositing at the receiver. Match the Fill format to the receiver in advanced settings. |
| With alpha | Send video with transparency information to a receiver that supports it. |
Only Composite includes the background color. FTB makes Fill / Key and alpha outputs transparent. All outputs except Key include audio; if receiving several outputs, choose only one audio feed to avoid duplicate playback.
Check: If no source is found, check sender output, network, firewall, and runtime diagnostics. For output, check that it is enabled and that a video output such as Composite is selected.
30VST3 add-on: audio effects
Where: Settings → Audio OUTPUT / VST buttons in EDIT and ON AIR
Adjust audio with VST3 effects. Choose separate plugins for EDIT, ON AIR ITEM, and MASTER. Prepare effects such as equalizers or compressors to suit your needs.
Before you start
Along with the VST3 add-on, you need a stereo VST3 effect for Windows 64-bit. Follow the vendor's installation and activation instructions. Instrument plugins are not supported.
Enable effects and adjust sound
- Restart after installing the add-on, then turn Use VST plug-ins ON in Settings → Audio OUTPUT. The EQ buttons become VST buttons.
- Click VST for the target you want to adjust. To listen first, open VST in EDIT.
- After scanning finishes, choose an effect from the list. If a newly installed effect is missing, click Rescan.
- Check the Running status and click OPEN to adjust the plugin in its interface. To listen in EDIT, check the PFL output and turn PFL ON.
- Turn Bypass ON to hear the original audio without the effect. Compare level and tone before and after processing, then configure ON AIR ITEM / MASTER for actual use.
Check each VST window title to confirm whether you are adjusting EDIT, ITEM, or MASTER. See Audio output for basic levels and output devices.
Plugin selection is saved, but settings inside the plugin are retained only during the current app session. Check them after restarting. Processing is stereo at 48 kHz; load and latency depend on the plugin.
Check: On failure, VST stops and playback continues with the original audio. Check the status and retry using the target's VST button. If the sound does not change, check the target, running state, bypass, and plugin settings. See VST3 requirements for supported scope.
31DeckLink add-on: hardware video and audio I/O
Where: Settings → DeckLink / INPUT CONTROL source list at the bottom left
Use Blackmagic Design DeckLink hardware for external video/audio input and ON AIR output through its connectors. Fill/key output for compositing on an external switcher is also supported. Available connectors and video formats depend on the device.
Before you start
You need DeckLink hardware and Desktop Video for Windows 64-bit. Restart Windows after driver installation and check the device in Desktop Video Setup. Install the DeckLink add-on and restart the app. See DeckLink requirements for software versions.
Receive external video and audio
- Turn Enable DeckLink input ON in Settings → DeckLink.
- Choose the Input format. Automatic (device signal detection) works on supported hardware. Otherwise, specify the input signal's resolution, frame rate, and other format details.
- Choose the DeckLink device, channel, and connector in the Controller's bottom-left input list, then click Add.
- Check video and PFL audio in EDIT before taking the source ON AIR. If you change the input format, add the input again.
Send ON AIR through the device
- Turn Enable DeckLink output ON in Settings → DeckLink.
- For normal output, enable Composite and choose the Output channel and Output format.
- For external compositing, enable Fill and Key, assigning different physical channels with the same video format. Do not assign the same channel to multiple enabled outputs.
- Check video on the receiver. Audio is sent to Composite and Fill; Key is silent.
Fill carries color video; Key carries monochrome transparency information. Match the Fill format (Straight / Premultiplied) to the receiver. FTB fades fill/key to transparent. Synchronized playback may require a common reference, depending on the device. If status shows Independent playback, the two outputs are not physically synchronized.
Half-duplex channels cannot input and output simultaneously. Inputs on different connectors or in different formats on the same channel also cannot be registered simultaneously. If a conflict appears, stop the input and remove its registered item, or use another independent channel.
Check: If a device is missing, check the connection and Desktop Video Setup. If video is missing, check channel, connector, format, and settings status. Verification with physical hardware, signals, audio, A/V synchronization, and extended operation is incomplete; test your setup before output.